SwiftUI — Exploring NavigationStack and Making it Useful
Background
Let’s be honest, NavigationView is terrible. Apart from the numerous limitations, developers had to deal with lots of bugs and had to add workarounds.
-We were no exception at Canopas!
While we were really excited about the newSwiftUI and were ready to integrate it into a few production projects, navigation was always a pain. We even developed a library UIPilot to make navigation as easy as possible.
2–3 years later, Apple finally realized that we need something new entirely, and there comes NavigationStack .
NavigationStack provides the capabilities that NavigationView lacked, like providing views similar to router systems and much more.
Let’s explore how to use NavigationStack for basic navigation operations.
Outline
Today, we will discuss 5 scenarios that cover 95% of use cases. Feel free to jump around as needed.
- Push screens: A ⮕ A — B
- Pop last screen: A — B ⮕ A
- Pop multiple screens: A — B — C — D ⮕ A — B
- Pop to root: A — B — C — D ⮕ A
- Update root: A ⮕ B
Sponsored
We are what we repeatedly do. Excellence, then, is not an act, but a habit. Try out Justly and start building your habits today!
Let’s get started!
1. Push screen: A ⮕ A — B

Pushing a screen is a very straightforward thing. Let’s start by defining NavigationStack.
struct ContentView: View {
    @ObservedObject
    var router = Router<Path>()

    var body: some View {
        NavigationStack(path: $router.paths) {
            ScreenA()
            .navigationDestination(for: Path.self) { path in
                switch path {
                case .A: ScreenA()
                case .B: ScreenB()
                }
            }
        }.environmentObject(router)
    }
}
Let’s understand the structure of the NavigationStack here.
- We have defined a variable
routerthat keeps track of the screen stack. When we want to push/pop screens, we will update it. This allows us to update screens programmatically very easily. - We have passed that variable to
NavigationStack, so it will understand which screens to show. - Inside content, we have defined
ScreenA, which will be the root of the screen and can not be changed. We will later see how we can get around this restriction. - Now comes the interesting part
navigationDestination. It allows us to mapRoutetoViews. For example, here we want that for enum.A,ScreenAshould be shown and for enum.B,ScreenBshould be shown. - At last, we inject this router as
environmentObject, so it’s easily accessible on all screens.
That’s it. Now let’s add definitions of Router and Screens.
final class Router<T: Hashable>: ObservableObject {
    @Published var paths: [T] = []
    func push(_ path: T) {
        paths.append(path)
    }
}

enum Path {
    case A
    case B
}

struct ScreenA: View {

    @EnvironmentObject var router: Router<Path>

    var body: some View {
        Button {
            router.push(.B)
        } label: {
            Text("Push Screen B")
        }.navigationTitle("A")
    }
}

struct ScreenB: View {
    var body: some View {
        Text("Hello I'm content of screen B")
        .navigationTitle("B")
    }
}
Very straightforward, isn’t it?
Router class is interesting here, it basically contains an Array of Path that NavigationStack needs. When we need to push a new screen, we just need to update the array by appending the path to the array!
Alright, enough with basics, let’s try to pop a screen!
2. Pop last screen: A — B ⮕ A

If you did run the above example, the pop already works by clicking on the navigation back button. However, what if we want to do it ourselves on some other button click?
It’s easier than you can think of. Let’s add a pop function in router class.
final class Router<T: Hashable>: ObservableObject {
    @Published var paths: [T] = []
    ...

    func pop() {
        paths.removeLast(1)
    }
}
final class Router<T: Hashable>: ObservableObject {
    @Published var paths: [T] = []
    ...

    func pop() {
        paths.removeLast(1)
    }
}
And then we just need to call that function on ScreenB on “pop” button click.
struct ScreenB: View {

    @EnvironmentObject var router: Router<Path>
    var body: some View {
        Button {
            router.pop()
        } label: {
            Text("Pop me")
        }.navigationTitle("B")
    }
}
That’s it. Now let’s explore how we can pop multiple screens from stacks.
3. Pop multiple screens: A — B — C — D ⮕ A — B

By now, you must have understood that to pop multiple screens from stack, we just need to modify paths variable in router so that it removes multiple items from the array.
Let’s add a pop function that takes an argument “to”, which will allow us to specify how many screens we want to pop from stack.
final class Router<T: Hashable>: ObservableObject {
    @Published var paths: [T] = []
    ...

    func pop(to: T) {
        guard let found = paths.firstIndex(where: { $0 == to }) else {
            return
        }

        let numToPop = (found..<paths.endIndex).count - 1
        paths.removeLast(numToPop)
    }
}
Here, we find index of the popping path and remove elements till that path. A very easy thing to do if you have worked with Arrays before (Of course you have if you are a programmer!)
And then we just need to call this function from ScreenD.
struct ScreenD: View {

    @EnvironmentObject var router: Router<Path>
    var body: some View {
        Button {
            router.pop(to: .B)
        } label: {
            Text("Pop to screen B")
        }.navigationTitle("D")
    }
}
4. Pop to root: A — B — C — D ⮕ A

This is a very easy thing to do. Just empty the path array.
final class Router<T: Hashable>: ObservableObject {
    @Published var paths: [T] = []
    ...

    func popToRoot() {
        paths.removeAll()
    }
}
and then call it from the ScreenD
struct ScreenD: View {
    @EnvironmentObject var router: Router<Path>

    var body: some View {
        Button {
            router.popToRoot()
        } label: {
            Text("Pop to Root")
        }.navigationTitle("D")
    }
}
This was the easiest!
5. Update root: A ⮕ B

Updating the root is a bit tricky as NavigationStack does not allow it.
To achieve this behavior, we will add additional view RouterView that wraps NavigationStack and conditionally chooses the root view. We will also need to update router class a bit. Here’s full implementation of both class that you can also directly use in your projects.
struct RouterView<T: Hashable, Content: View>: View {

    @ObservedObject
    var router: Router<T>

    @ViewBuilder var buildView: (T) -> Content
    var body: some View {
        NavigationStack(path: $router.paths) {
            buildView(router.root)
            .navigationDestination(for: T.self) { path in
                buildView(path)
            }
        }
        .environmentObject(router)
    }
}

final class Router<T: Hashable>: ObservableObject {
    @Published var root: T
    @Published var paths: [T] = []

    init(root: T) {
        self.root = root
    }

    func push(_ path: T) {
        paths.append(path)
    }

    func pop() {
        paths.removeLast()
    }

    func updateRoot(root: T) {
        self.root = root
    }

    func popToRoot(){
       paths = []
    }
}
As you can see here, RouterView takes a view builder as an argument and uses it for one additional use case apart from passing it to navigationDestination of NavigationStack and that is for generating the root view.
There’s an additional updateRoot function in Router that allows us to update the root when needed.
Usage of RouterView is even more easier than NavigationStack
struct ContentView: View {
    @ObservedObject
    var router = Router<Path>(root: .A)

    var body: some View {
        RouterView(router: router) { path in
            switch path {
            case .A: ScreenA()
            case .B: ScreenB()
            case .C: ScreenC()
            case .D: ScreenD()
        }
    }
}
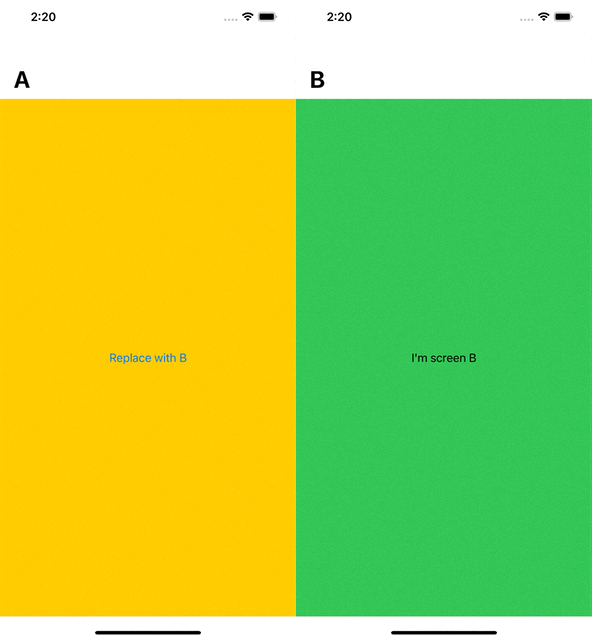
Now you can call updateRoot in any of the screens and root view will be updated.
struct ScreenA: View {

    @EnvironmentObject var router: Router<Path>

    var body: some View {
        Button {
            router.updateRoot(root: .B)
        } label: {
            Text("Replace with B")
        }.navigationTitle("A")
    }
}
Well, that’s all! Click on the button and you will see ScreenA replaced with ScreenB.
Conclusion
Hope you have a basic idea of how NavigationStack works. It’s very easy to learn.
However, adding additional helper classes like Router and RouterView makes common use cases even more straightforward.
Keep in mind that NavigationStack is only available on iOS 16 and that means you will have to manage two different implementations depending on the OS version!
Don’t worry though, we are going to update our UIPilot library and will make it backward compatible so that it uses NavigationStack on new platforms and fallbacks to NavigationView for older versions. UIPilot is a very tiny library, probably just a composition of Router and RouterView classes you saw here.
The good news is, that there will be no API changes, so you will just need to update the UIPilot version to start using NavigationStack .
As always, your feedback and suggestions are very welcome, please leave them in the comment section below.
Related Popular Articles


Whether you need...
- *High-performing mobile apps
- *Bulletproof cloud solutions
- *Custom solutions for your business.
