Integrating Live Activity and Dynamic Island in iOS: A Complete Guide - Part 1
Background
With the release of iOS 16, Apple introduced Live Activities, and later with iPhone 14 Pro, the Dynamic Island—two powerful tools that allow us to present real-time, glanceable updates directly on the Lock Screen and at the top of the screen on the Dynamic Island. These features are designed to keep users informed about ongoing activities, like delivery tracking, live sports scores, or wait times, without requiring them to unlock their devices or open the app.
In this two-part guide, we’ll discuss everything you need to know to integrate Live Activities and Dynamic Island effectively in your iOS app. We'll detail each step from understanding design constraints to setting up a Live Activity and handling updates.
What we're going to cover in this first part,
- What Are Live Activities and Dynamic Island?
- Live Activity presentations and constraints
- Design layout for different presentations
- Start, update and end the activity
And, our second part will cover
- Animating state updates in Live Activities
- Handling live activity from a push notification
To demonstrate these concepts, we’ll build a Live Activity that displays wait time. This will give users a real-time view of how long they’ll need to wait—perfect for restaurant queues or appointment scheduling scenarios.
Here's what will achieve at the end of this blog.
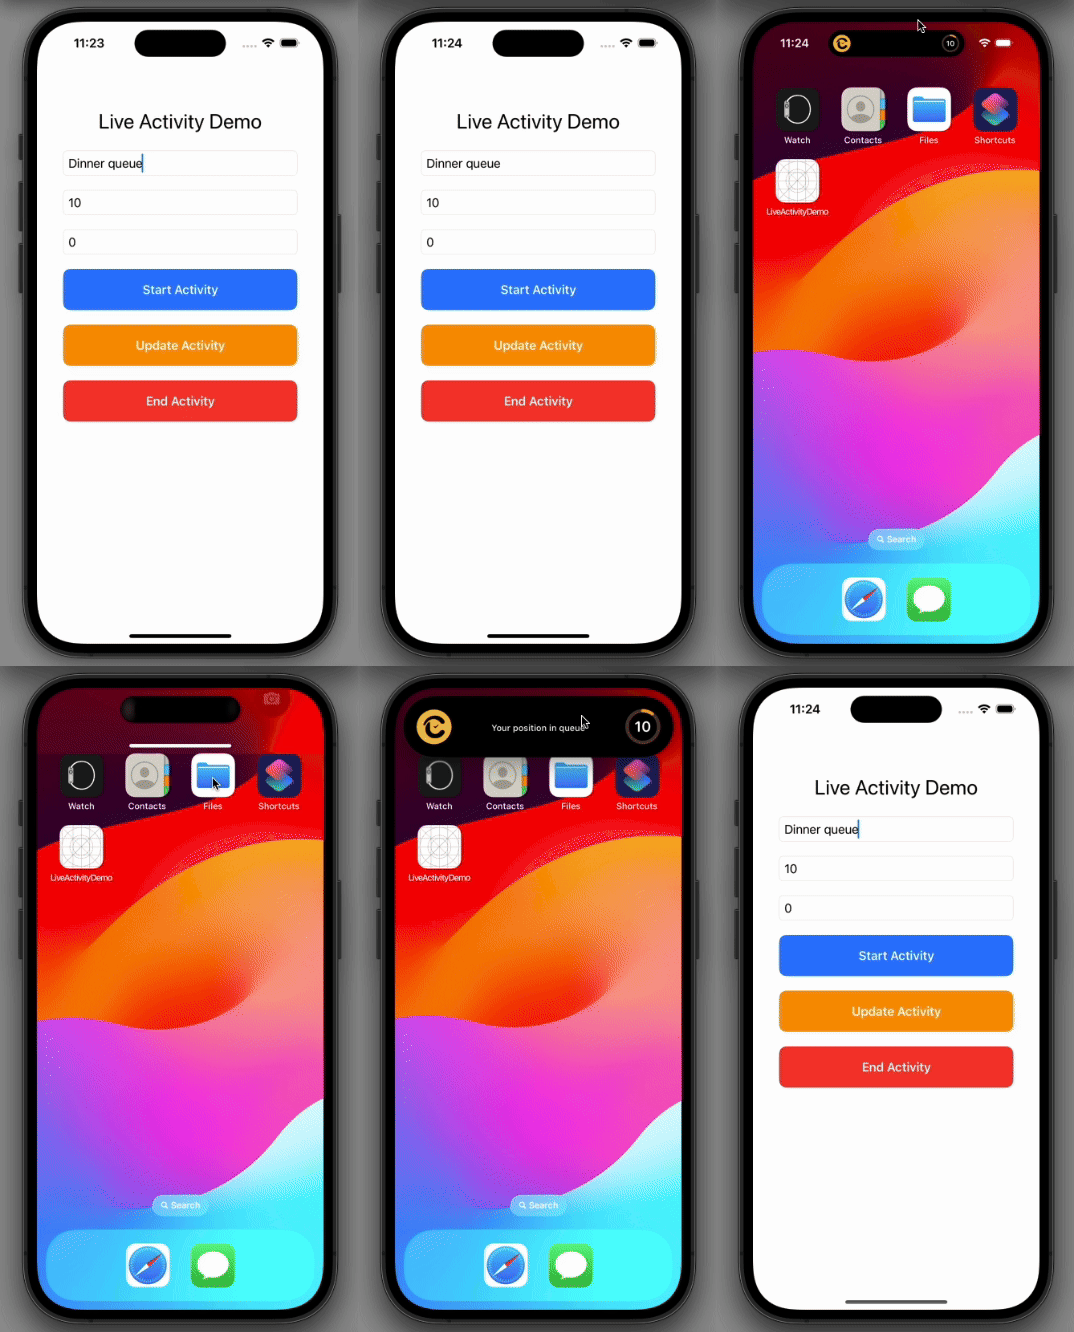
This blog is also available as a Youtube video, feel free to check it out.
What Are Live Activities and Dynamic Island?
Live Activities allow apps to display real-time information on the Lock Screen. These updates are perfect for tracking time-sensitive events like food delivery, ride-sharing ETAs, etc.
Dynamic Island extends this functionality by offering a compact, interactive display area. Users can see and interact with live updates at the top of their screens while using other apps, creating a nondisturbing way to stay informed on background activities like calls, music, and live events.
Live Activity presentations and constraints
Before implementing Live Activities and Dynamic Island, it’s important to understand the design guidelines and presentation options available. Apple has specific constraints and recommendations to ensure that these features offer a consistent, user-friendly experience across apps.
Presentations for Live Activities
Live Activities offers different presentation styles on the Lock Screen and Dynamic Island. Understanding these styles is crucial to creating a well-designed Live Activity that feels native to iOS.
Lock Screen Presentation
On the Lock Screen, Live Activities appear as banners with detailed information. They provide a flexible area for displaying key data about your app’s real-time events, like estimated arrival, or live score updates.
Dynamic Island Presentations
Compact Presentation
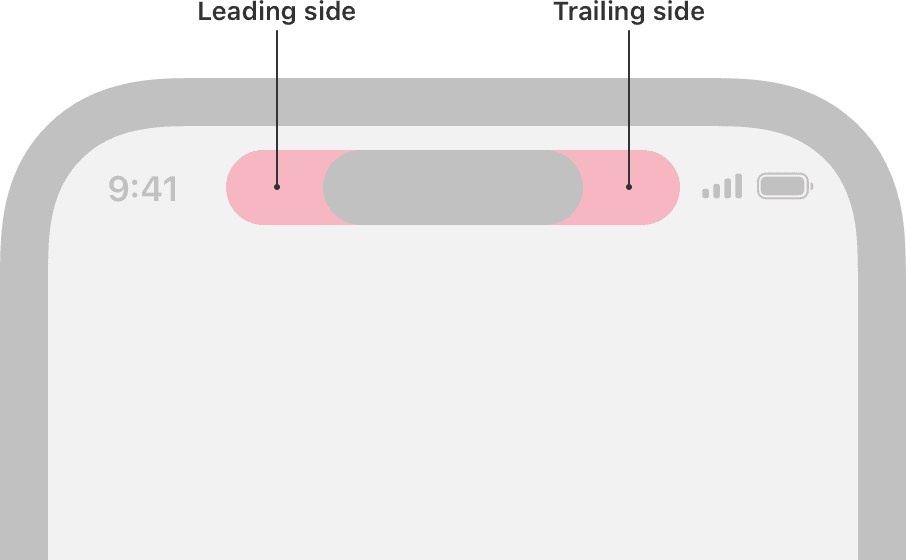
The compact view is the most commonly seen view, typically displayed when the device is not actively engaged with ongoing tasks. It consists of two separate elements positioned on either side of the TrueDepth camera.
To ensure clarity, use consistent colors and typography for visibility, and avoid adding padding between the content and the camera to prevent misalignment.
Make sure that tapping on either the leading or trailing content opens the same scene in your app to provide a consistent and intuitive user experience.
Minimal Presentation
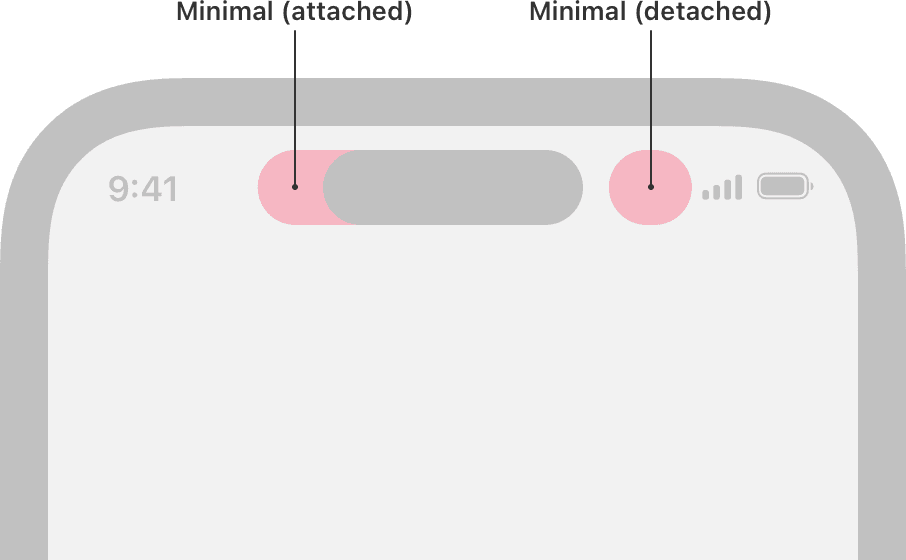
The minimal presentation is used when multiple Live Activities are active simultaneously. In this state, your Live Activity is displayed as a small circle or oval, either on the Dynamic Island or detached from it. This presentation should focus on delivering the most essential and up-to-date information.
Instead of a logo, display live, dynamic content like a countdown or real-time update of the essential information, even if it means abbreviating details. When users tap on the minimal display, it should open the app to the relevant event or task for more details. If the users touch and hold the minimal Live Activity, users can access essential controls or view more content in the expanded presentation.
Expanded Presentation
The expanded presentation appears when users tap and hold a compact or minimal Live Activity. This view gives more space for detailed information and interactions, while still keeping the smooth, rounded "capsule" shape.
Make sure the content expands in a way that feels natural and doesn’t cause confusion. If you need more vertical space, keep the edges curved to maintain a clean look. Avoid making the height awkward or uneven. Like the other presentations, keep your content aligned around the camera area to maintain a tidy and efficient layout.
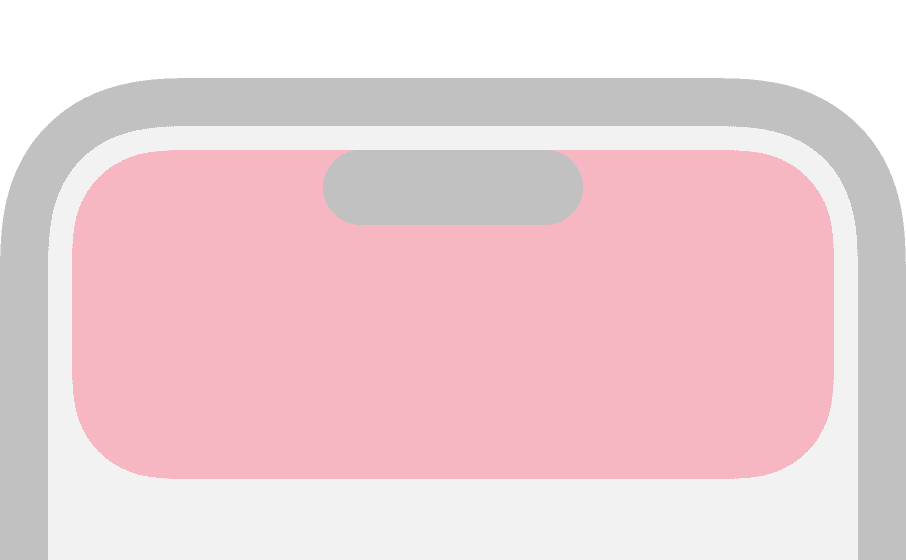
Constraints
- Avoid Overcrowding: Don’t overcrowd the Live Activity with too much information. Keep it concise and focus on the most relevant data to ensure clarity and a good user experience.
- Content Alignment: When designing Live Activities, make sure content is properly aligned and visually balanced around the camera area (in the compact and expanded presentations) to avoid misalignment.
- Image Asset Size: The image used in a Live Activity must fit within the size limits of the presentation for the device. If the image is too large, the system may not start the Live Activity. For example, an image for the minimal presentation should not exceed 45x36.67 points.
- Duration of Live Activity: A Live Activity can be active for up to 8 hours. After this, the system automatically ends it and removes it from the Dynamic Island. However, it will stay on the Lock Screen for up to 4 more hours, or until manually removed, whichever happens first. This means a Live Activity can remain on the Lock Screen for a maximum of 12 hours.
- Live Activity Sandbox: Each Live Activity runs in its own sandbox. Unlike widgets, it can't access the network or receive location updates. If you need to update the data, use ActivityKit in your app or allow the Live Activity to receive push notifications through ActivityKit.
- Minimal Distractions: Since Live Activities are meant to provide quick, glanceable information, avoid cluttering them with non-essential details. Stick to only the most important and up-to-date data that users need to see at a glance.
- Data size limit: The combined size of static and dynamic data for a Live Activity, including data for ActivityKit updates and ActivityKit push notifications, cannot exceed 4 KB. Keep the data within this limit to ensure proper functionality and smooth performance of your Live Activity.
Integrate Live Activity
To add Live Activity support to an iOS app, you can do the following:
Add a Widget Extension
- Go to File > New > Target
- Select Widget Extension
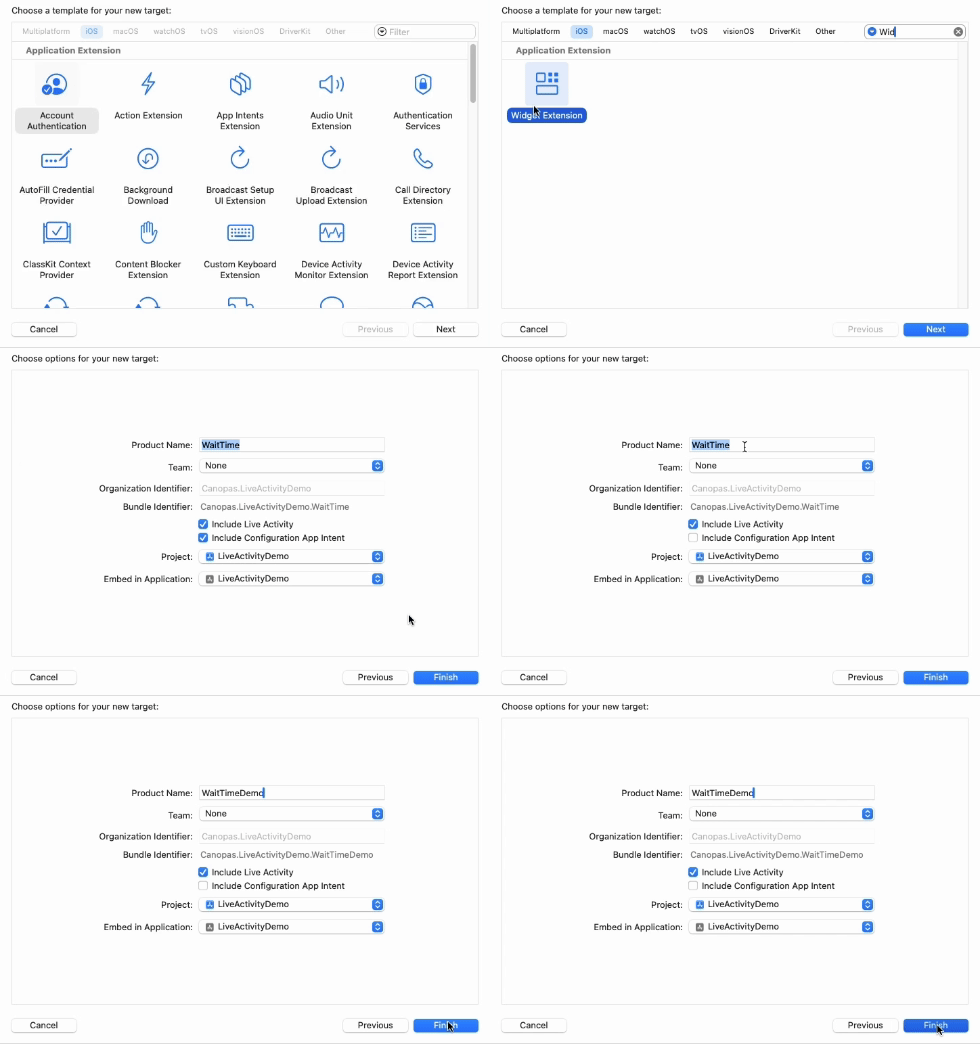
- Enter a name and select Include Live Activity
- Click Finish
Note - You can create a widget extension to use Live Activities without having to include widgets.
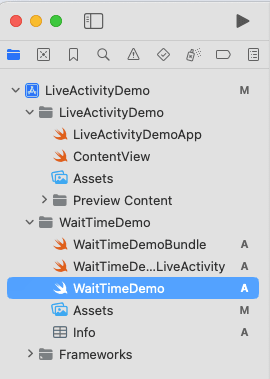
Here's what you'll have after following the above steps
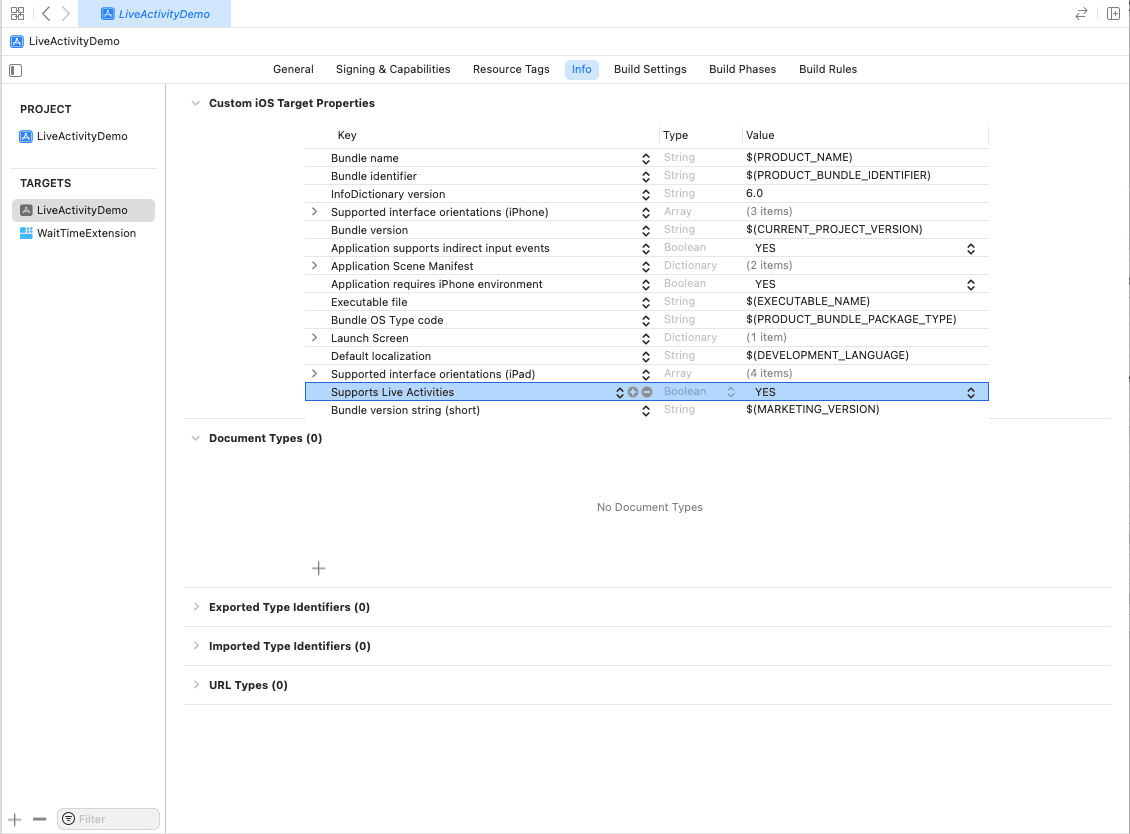
Configure Info.plist
- Find the
Info.plistfile in the primary target - Insert the Supports Live Activities key
- Set its value to YES
Define the data to display
The ActivityAttributes protocol allows you to define the data structure for a Live Activity in iOS, which provides users with real-time updates from your app directly on the lock screen or in Dynamic Island. The protocol's design enables you to separate the static information (which doesn’t change over time) from dynamic, real-time data.
In this example, we’ll look at the WaitTimeDemoAttributes structure, which could be part of a waitlist management app. This implementation displays the user’s current position in the queue and their progress through the waitlist as dynamic data, while also including waitlist details such as the name of the waitlist and booking ID as static data.
Here’s how the WaitTimeDemoAttributes structure is implemented:
import Foundation
import ActivityKit
struct WaitTimeDemoAttributes: ActivityAttributes {
   public typealias WaitlistStatus = ContentState
   public struct ContentState: Codable, Hashable {
       var currentPositionInQueue: Int
       var progress: Double
   }
   var waitlistName: String
   var bookingId: String
}
Create Layout
The WaitTimeDemoLiveActivity widget provides a customizable interface for displaying live updates about wait times in a compact and informative way. This widget is configured with ActivityConfiguration, allowing it to adapt its appearance across different device states like the lock screen and Dynamic Island, making it particularly useful for real-time information delivery in iOS 16 and later.
Here’s an in-depth look at each part of the WaitTimeDemoLiveActivity implementation:
struct WaitTimeDemoLiveActivity: Widget {
   var body: some WidgetConfiguration {
       ActivityConfiguration(for: WaitTimeDemoAttributes.self) { context in
           // Lock screen/banner UI goes here
           VStack {
               // Add components for the lock screen UI here
           }
           .activityBackgroundTint(Color.cyan)
           .activitySystemActionForegroundColor(Color.black)
       }

....- ActivityConfiguration: This setup uses
ActivityConfigurationto display a Live Activity forWaitTimeDemoAttributes. This configuration defines the widget’s layout when viewed on the lock screen or as a banner notification. - activityBackgroundTint and activitySystemActionForegroundColor: These properties control the background colour and text colour in the lock screen or banner view.
        dynamicIsland: { context in
           DynamicIsland {
               // Expanded UI goes here.  Compose the expanded UI through
               // various regions, like leading/trailing/center/bottom
               DynamicIslandExpandedRegion(.leading) {
                   Text("Leading")
               }
               DynamicIslandExpandedRegion(.trailing) {
                   Text("Trailing")
               }
               DynamicIslandExpandedRegion(.bottom) {
                   // expanded content
               }
               DynamicIslandExpandedRegion(.center) {
                   // center content
               }
           }
       ....
Dynamic Island Configuration: The dynamicIsland block defines the layout for Dynamic Island, available on supported iPhones. Within the DynamicIsland view, you can divide the content into different regions:
The expanded view of Dynamic Island has four main areas:
- Center: This area displays content directly below the TrueDepth camera.
- Leading: This area positions content along the left (leading) edge of the expanded Live Activity, adjacent to the TrueDepth camera, and can extend additional content beneath it.
- Trailing: This area places content on the right (trailing) edge, next to the TrueDepth camera, with space for more content below.
- Bottom: This area sits underneath the leading, trailing, and centre sections, providing extra space for content.
 compactLeading: {
                Text("L")
            } compactTrailing: {
                Text("T")
            } minimal: {
                Text("M")
            }
            .widgetURL(URL(string: "http://www.apple.com"))
            .keylineTint(Color.red)
        }
    }
}- Compact Views:
compactLeadingandcompactTrailing: These define content in the compact Dynamic Island state, such as a single letter or icon.minimal: This represents the smallest possible view in the Dynamic Island, useful for showing very minimal information.
- widgetURL: Adds a tappable URL to the widget, allowing users to navigate directly from the widget to the specified URL when tapped.
- keylineTint: Sets the keyline tint color, which can be used to accentuate the widget's border or separation lines, helping highlight different sections.
Note: Make sure your layout follows the design guidelines, for details information, check Live Activity Specification
Lock Screen presentation
Now, let's design the layout for lock screen or banner
ActivityConfiguration(for: WaitTimeDemoAttributes.self) { context in
           // Lock screen/banner UI
           LiveActivityContent(progress: context.state.progress,
                               position: context.state.position,
                               waitlistName: context.attributes.waitlistName)
       }

.... - context.state: contains the dynamic data that can change throughout the activity.
- context.attributes: context.attributes contains static data that does not change during the activity’s lifecycle.
Now Let's see LiveActivityContent
struct LiveActivityContent : View {
    let progress: Double
    let position: Int
    let waitlistName: String

    var body: some View {
        VStack {
            HStack {
                Text(waitlistName).font(.system(size: 13))
                    .fontWeight(.medium).foregroundColor(Color("TextSecondary")).lineLimit(1)
                Spacer()
                AppLogo(size: 24)
            }
            HStack {
                VStack(alignment: .leading) {
                    QueuePostion(position: position)
                    HorizontalProgressBar(level: progress).frame(height: 8)
                }
                Spacer()
                QueueIllustration(position: position)
            }

        }.padding(16)
            .activityBackgroundTint(Color("WidgetBackground"))
            .activitySystemActionForegroundColor(Color.black)
    }
}

struct HorizontalProgressBar: View {
    var level: Double

    var body: some View {
        GeometryReader { geometry in
            let frame = geometry.frame(in: .local)
            let boxWidth = frame.width * level

            RoundedRectangle(cornerRadius: 20)
                .foregroundColor(Color("ContainerHigh"))

            RoundedRectangle(cornerRadius: 20)
                .frame(width: boxWidth)
                .foregroundColor(Color("PrimaryColor"))

        }
    }
}

struct QueuePostion: View {
    let position: Int

    var body: some View {
        VStack(alignment: .leading) {
            HStack(alignment: .firstTextBaseline) {
                Text("\(position)")
                    .font(.system(size: 36, weight: .semibold)).lineSpacing(48).foregroundColor(Color("TextPrimary"))
                Text(" is your current")
                    .font(.system(size: 18, weight: .semibold))
                    .lineSpacing(26).foregroundColor(Color("TextPrimary"))
            }
            Text("position in the queue")
                .font(.system(size: 18, weight: .semibold)).foregroundColor(Color("TextPrimary"))
        }
    }
}

struct QueueIllustration :View {
    let position: Int

    var imageName: String {
        if position < 5 {
            return "queue4"
        } else if position < 9 {
            return "queue3"
        } else if position < 25 {
            return "queue2"
        } else {
            return "queue1"
        }
    }

    var body: some View {
        Image(uiImage: UIImage(named: imageName)!)
            .resizable().frame(width: 100, height: 100)
            .scaledToFit()
    }
}

struct AppLogo :View {
    let size: CGFloat
    var body: some View {
        Image(uiImage: UIImage(named: "AppLogo")!)
            .resizable().frame(width: size, height: size)
            .scaledToFit()
            .clipShape(.circle)
    }
}
here's the preview to check the layout
#Preview("LockScreen", as: .content, using: WaitTimeDemoAttributes.preview) {
   WaitTimeDemoLiveActivity()
} contentStates: {
    for i in stride(from: 10, through: 1, by: -1) {
        let progress = (10 - Double(i)) / 10.0
        WaitTimeDemoAttributes.ContentState(currentPositionInQueue: i, progress: progress)

    }
}
Now let's see the preview of our lock screen presentation
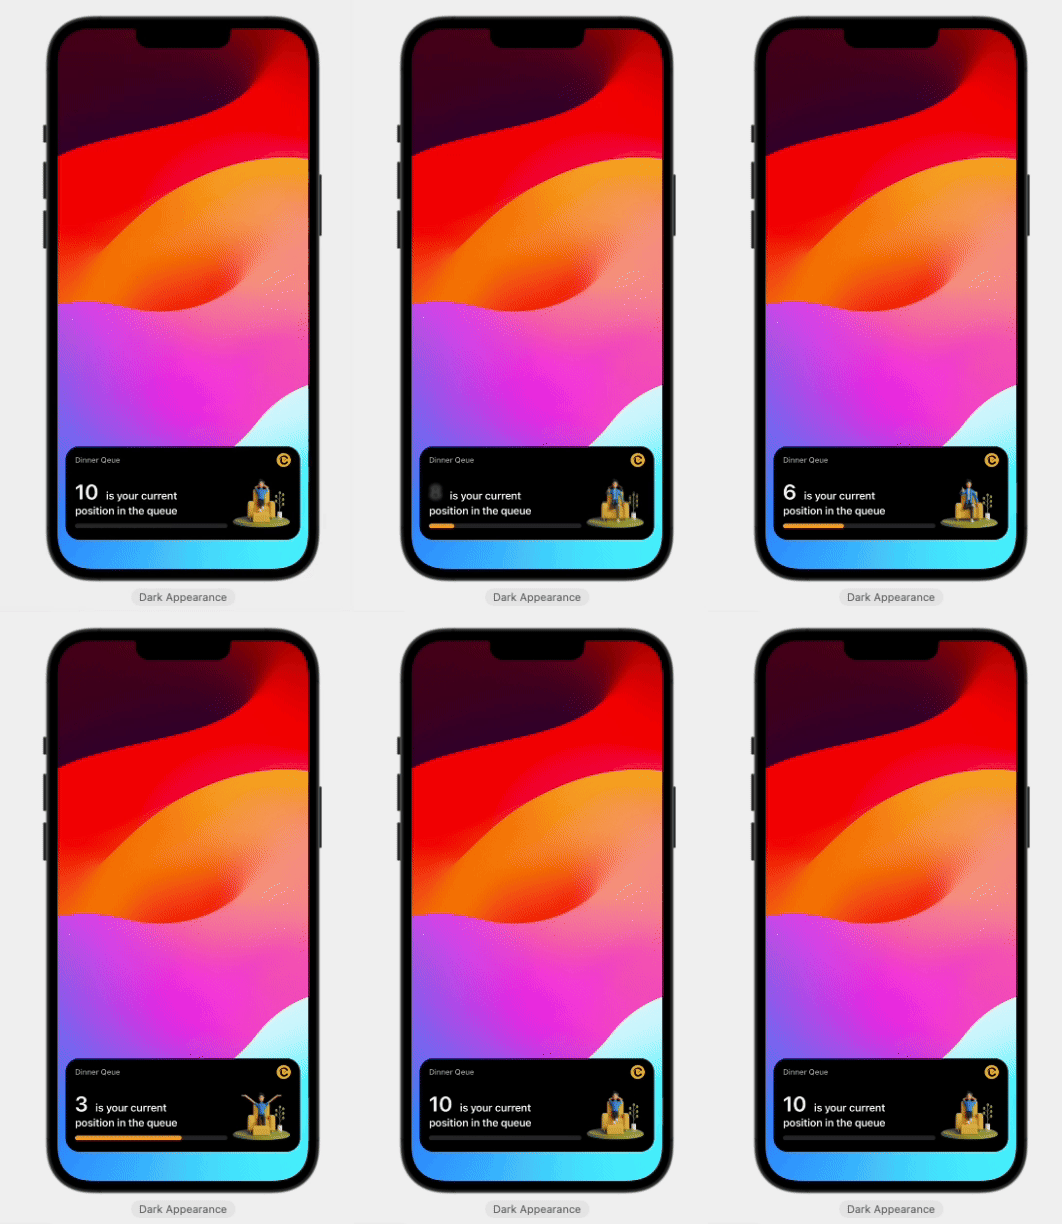
Minimal and Compact presentation
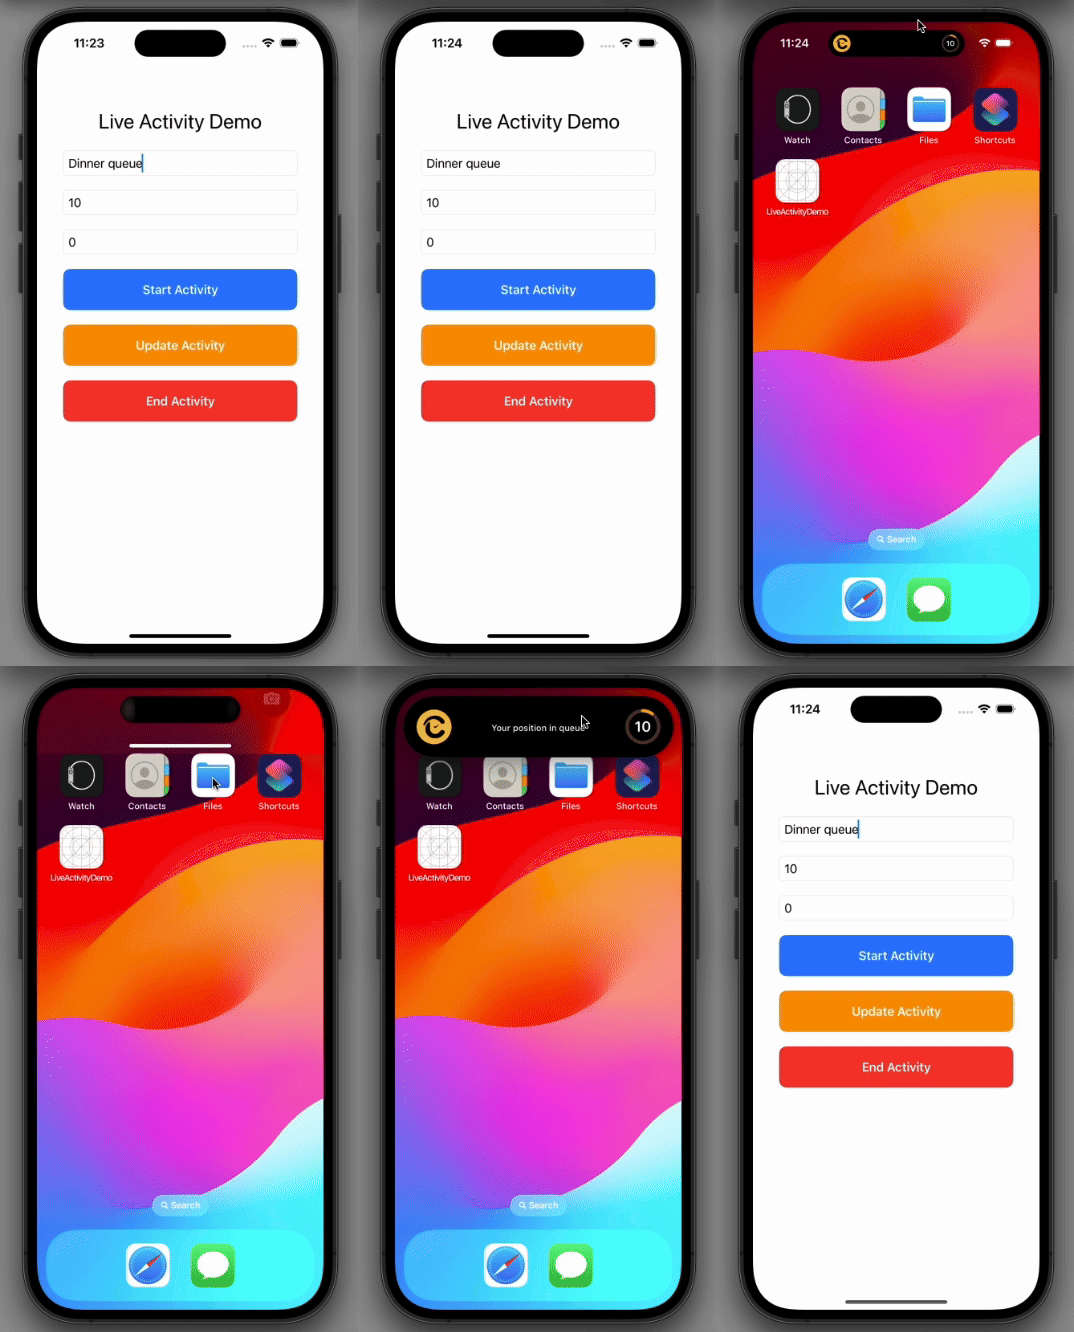
In the compactLeading position, we'll display our demo app's logo, and in compactTrailing, we'll show a circular progress bar that reflects the user's position in the queue.
       dynamicIsland: { context in
            DynamicIsland {
                // Extended presentation goes here
            } compactLeading: {
                AppLogo(size: 24)
            } compactTrailing: {
                MinimalProgressBar(progress: context.state.progress,
                                   currentPositionInQueue: context.state.currentPositionInQueue,
                                   size: 24)
            } minimal: {
                MinimalProgressBar(progress: context.state.progress,
                                   currentPositionInQueue: context.state.currentPositionInQueue,
                                   size: 24)
            }
        }
struct MinimalProgressBar: View {

    let progress: Double
    let currentPositionInQueue: Int
    let size: CGFloat

    var body: some View {
        ProgressView(value: progress, total: 1) {
            Text("\(currentPositionInQueue)")
        }.frame(width: size, height: size)
            .progressViewStyle(.circular)
            .tint(Color("PrimaryColor"))
    }
}

struct AppLogo :View {
    let size: CGFloat
    var body: some View {
        Image(uiImage: UIImage(named: "AppLogo")!)
            .resizable().frame(width: size, height: size)
            .scaledToFit()
            .clipShape(.circle)
    }
}
and here is a preview of our compact and minimal presentation


Extended presentation
When the user taps and holds the compact/minimal presentation, the system shows detailed information about ongoing activity in this presentation. For minimal content, keep the expanded shape short, maintaining a capsule-like form with smooth, continuous curves. For more content, use a taller, rectangular shape with rounded edges.
Wrap content tightly around the TrueDepth camera, avoiding empty space on the leading and trailing sides and below it. In our demo we have minimal content, so we'll use the leading, trailing and center space only.
@DynamicIslandExpandedContentBuilder
private func expandedContent(waitlistName:String,
                             contentState: WaitTimeDemoAttributes.ContentState) -> DynamicIslandExpandedContent<some View> {
    DynamicIslandExpandedRegion(.leading) {
        AppLogo(size: 48)
    }
    DynamicIslandExpandedRegion(.trailing) {
        MinimalProgressBar(progress: contentState.progress,
                           currentPositionInQueue: contentState.currentPositionInQueue,
                           size: 48)
    }
    DynamicIslandExpandedRegion(.center) {
        Text("Your position in queue")
            .font(.system(size: 12, weight: .medium)).foregroundColor(Color("TextPrimary"))
    }
}
  dynamicIsland: { context in
            DynamicIsland {
                expandedContent(
                    waitlistName: context.attributes.waitlistName,
                    contentState: context.state
                )
            } compactLeading: {
                ....
            }

            ...

        }
Now that we've completed all the layout design, it's time to integrate Live activities, but before that, keep the following points in mind:
- Check availability: Always verify if Live Activities are available using
areActivitiesEnabledbefore presenting the option to start a Live Activity in your app. This ensures that the feature is supported on the user's device. - Foreground Only: Live Activities can only be started when your app is in the foreground. You cannot initiate them if the app is in the background.
- System Limitations: Be mindful that there are system limits on the number of Live Activities that can run at once. If your app tries to start more than the system allows, gracefully handle the failure
- App Crash or Termination: If your app crashes or is terminated while a Live Activity is running, make sure to handle this scenario when the app relaunches by checking for active Live Activities and resuming or ending them accordingly.
- Relevance Score: When your app starts multiple Live Activities, use the relevance score to prioritize which Live Activity appears on the Lock Screen and in the Dynamic Island. A higher relevance score ensures that the most important activity is shown prominently, while others may be placed lower in the queue.
- Automatic Removal: The system will automatically remove a completed Live Activity from the Lock Screen after a set time, but you can control this via the dismissal policy. For immediate removal, set dismissalPolicy to
.immediate. - Limit Content Size: Keep in mind that the size of the dynamic content you update for a Live Activity cannot exceed 4KB
Manually handling the states—start, update, and end—for a live activity allows us to provide timely, interactive updates directly within the app. While push notifications (APNs) are great for sending real-time updates externally, there are cases where an in-app trigger is more efficient. This is particularly useful in scenarios where instant feedback is critical, like appointment tracking or live sports scores, and allows the app to stay responsive even when push notifications may be delayed or limited.
For example, if a user initiates an action like joining a waitlist, we can immediately start the live activity without relying on server communication. Similarly, if conditions change (e.g., wait time adjustments or completion), updating or ending the activity manually ensures the user sees the latest information instantly.
To keep this demo simple, we'll add three buttons to start, update and end the activity.
import SwiftUI

struct LiveActivityDemoView: View {
    @State private var waitlistName: String = ""
    @State private var queuePosition: Int = 0
    @State private var progress: Double = 0.0

    var body: some View {
        VStack(spacing: 20) {
            Text("Live Activity Demo")
                .font(.title)
                .padding(.top, 40)

            // Text Field for Waitlist Name
            TextField("Enter Waitlist Name", text: $waitlistName)
                .textFieldStyle(RoundedBorderTextFieldStyle())
                .padding(.horizontal, 20)

            // Text Field for Queue Position
            TextField("Enter Queue Position", value: $queuePosition, formatter: NumberFormatter())
                .textFieldStyle(RoundedBorderTextFieldStyle())
                .padding(.horizontal, 20)
                .keyboardType(.numberPad)

            // Text Field for Progress
            TextField("Enter Progress (0.0 to 1.0)", value: $progress, formatter: NumberFormatter())
                .textFieldStyle(RoundedBorderTextFieldStyle())
                .padding(.horizontal, 20)
                .keyboardType(.decimalPad)

            // Start Button
            Button(action: {
                // Action to start the live activity will go here
            }) {
                Text("Start Activity")
                    .font(.headline)
                    .foregroundColor(.white)
                    .padding()
                    .frame(maxWidth: .infinity)
                    .background(Color.blue)
                    .cornerRadius(10)
            }
            .padding(.horizontal, 20)

            // Update Button
            Button(action: {
                // Action to update the live activity will go here
            }) {
                Text("Update Activity")
                    .font(.headline)
                    .foregroundColor(.white)
                    .padding()
                    .frame(maxWidth: .infinity)
                    .background(Color.orange)
                    .cornerRadius(10)
            }
            .padding(.horizontal, 20)

            // End Button
            Button(action: {
                // Action to end the live activity will go here
            }) {
                Text("End Activity")
                    .font(.headline)
                    .foregroundColor(.white)
                    .padding()
                    .frame(maxWidth: .infinity)
                    .background(Color.red)
                    .cornerRadius(10)
            }
            .padding(.horizontal, 20)

            Spacer()
        }
        .padding()
    }
}
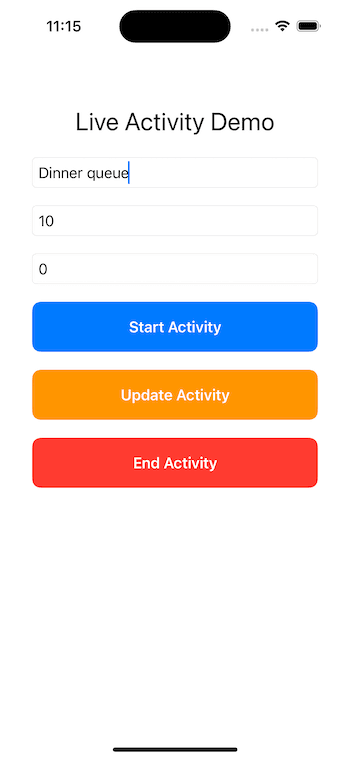
Great! We’ll create a LiveActivityManager class to manage the activity's lifecycle.
import Foundation
import ActivityKit


class LiveActivityManager {
    static let shared = LiveActivityManager()
    private var activity: Activity<WaitTimeDemoAttributes>?

    private init() {}

    func startActivity(waitlistName: String, positionInQueue: Int, progress: Double) {

    }

    func updateActivity(positionInQueue: Int, progress: Double) {

    }

    func endActivity(positionInQueue: Int, progress: Double) {

    }
}
Start Live Activity
To start the activity we'll use the Activity.request API:
func startActivity(waitlistName: String, positionInQueue: Int, progress: Double) {
        if ActivityAuthorizationInfo().areActivitiesEnabled {
            // Define the initial state and attributes
            let attributes = WaitTimeDemoAttributes(waitlistName: waitlistName, bookingId: "1234")
            let initialContentState = WaitTimeDemoAttributes.WaitlistStatus(
                currentPositionInQueue: positionInQueue,
                progress: progress
            )

            // Start the live activity
            do {
                let activity = try Activity<WaitTimeDemoAttributes>.request(
                    attributes: attributes,
                    content: .init(state: initialContentState, staleDate: nil),
                    pushType: nil // No pushType since we're handling it in-app for now
                )
                self.activity = activity
                print("Live activity started: \(activity.id)")
            } catch {
                print("Failed to start live activity: \(error)")
            }
        }
    }
Here's a breakdown of each parameter:
- attributes: Defines the activity's static content, such as the name and other identifying details that don’t change.
- content: Sets up the dynamic content, allowing the live activity to display real-time data, such as initialContentState. The optional
staleDateparameter can specify when the data becomes outdated, but here we set it to nil to let it stay relevant indefinitely. - pushType: Set to nil here because we’re managing activity updates within the app itself, not through ActivityKit push notifications.
This setup allows us to create a Live Activity that’s manageable in-app, without relying on server push notifications for updates.
Update Live Activity
After you start a Live Activity, you can update its content using the update(_:) function of the Activity object you created.
Note: The system will ignore updates to a Live Activity that has already ended (i.e., in the ended state). So, you can only update a Live Activity that is still active.
func updateActivity(queuePosition: Int, progress: Double) {
            guard let activity = activity else { return }

            let updatedContentState = WaitTimeDemoAttributes.ContentState(currentPositionInQueue: queuePosition, progress: progress)

            Task {
                await activity.update(using: updatedContentState)
                print("Live Activity updated with queue position: \(queuePosition) and progress: \(progress).")
            }
        }
Button(action: {
LiveActivityManager.shared.updateActivity(queuePosition: queuePosition, progress: progress)
}) {
...
}.padding(.horizontal, 20)Now let's run the app, and check the output
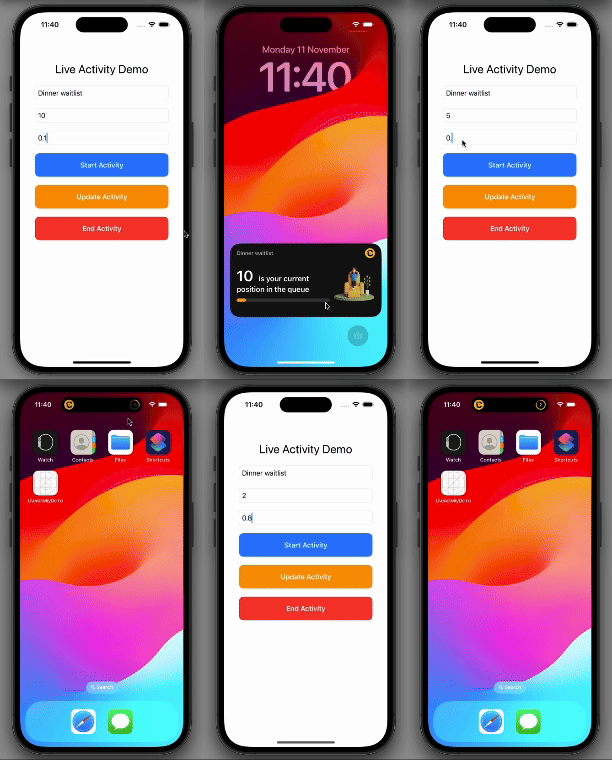
To notify the user about important updates, you can use the update(_:alertConfiguration:) function.
In our wait time example, you can use the update(_:alertConfiguration:) function to notify the user about important updates in the Live Activity. For instance, if the wait time is updated to a much shorter duration, you could trigger an alert to let the user know that their position in the queue is moving faster. This will notify the user immediately, ensuring they don't miss any critical changes, like the fact that their table is now ready or they’re nearing the top of the list.
func updateActivity(queuePosition: Int, progress: Double, alert: Bool) {
        guard let activity = activity else { return }

        let updatedContentState = WaitTimeDemoAttributes.ContentState(currentPositionInQueue: queuePosition, progress: progress)

        Task {
            // Only create alertConfig if alert is true
            var alertConfig: AlertConfiguration? = nil
            if alert {
                let waitlistName = activity.attributes.waitlistName
                let position = activity.content.state.currentPositionInQueue

                // Configure the alert if the waitlist status changes significantly
                alertConfig = AlertConfiguration(
                    title: "You're next in line!",
                    body: "Your table at \(waitlistName) is almost ready. Position: \(position).",
                    sound: .default
                )
            }


            await activity.update(ActivityContent(state: updatedContentState, staleDate: nil), alertConfiguration: alertConfig)
            print("Live Activity updated with queue position: \(queuePosition) and progress: \(progress).")
        }
    }
End Live Activity
To end a Live Activity, we'll use the end() function on the Activity object. Ending an activity signals to the system that the Live Activity has concluded, and it will no longer be updated or shown on the Lock Screen or the Dynamic Island.
Here’s when you would typically end a Live Activity:
- When the wait time has passed, and the user’s table is ready.
- When the event or activity has finished, such as a delivery arriving or a ride reaching its destination.
You should ensure that the Live Activity is ended once the purpose of the activity has been fulfilled.
func endActivity() {
        guard let activity = activity else { return }

        let endContent = WaitTimeDemoAttributes.ContentState(currentPositionInQueue: 1, progress: 1.0)

        Task {
            await activity.end(ActivityContent(state: endContent, staleDate: nil), dismissalPolicy: .immediate)
            print("Live Activity ended.")
        }
    }
Button(action: {
LiveActivityManager.shared.endActivity()
}) {
.....
}.padding(.horizontal, 20)- Content State: Make sure to include the latest content state when ending the Live Activity, so users can see the final information before it disappears.
- Dismissal Policies: You can control how the Live Activity is removed from the Lock Screen:
- Immediate Removal: If you want the Live Activity to disappear instantly, use
.immediatefor the dismissal policy. - Delayed Removal: If you prefer to let the Live Activity stay visible for a while after it ends, you can set a specific time using
after(_:). By default, the system will keep it for up to four hours after it ends before removing it automatically
- Immediate Removal: If you want the Live Activity to disappear instantly, use
Conclusion
In the first part, we covered the essentials—from understanding Live Activities and Dynamic Island to setting up, updating, and ending an activity. In the upcoming second part, we’ll dive deeper into advanced topics like animating state changes, managing updates through push notifications, and adding interactive elements like buttons and toggles.
Stay tuned for Part 2, where we’ll bring everything together and create an even more immersive experience!

