Golang + htmx + Tailwind CSS: Create a Responsive Web Application
Background
In today’s web development landscape, JavaScript has long been the language of choice for creating dynamic and interactive web applications.
As a Go developer, what if you don’t want to use Javascript and still implement a responsive web application?
Imagine a sleek to-do list app that updates instantly as you check off tasks without a full-page reload. This is the power of Golang and htmx!
Combining Go and htmx allows us to create responsive and interactive web applications without writing a single line of JavaScript.
In this blog, we will explore how to use htmx and Golang to build web applications. (It can be used with other your favorite platforms, too.)
As a learning, we will implement basic create and delete operations for users.
This blog is also available as a Youtube video, feel free to check it out.
What is htmx?
htmx is a modern HTML extension that adds bidirectional communication between the browser and the server.
It allows us to create dynamic web pages without writing JavaScript, as it provides access to AJAX, server-sent events, etc in HTML directly.
How htmx works?
- When a user interacts with an element that has an htmx attribute (e.g., clicks a button), the browser triggers the specified event.
- htmx intercepts the event and sends an HTTP request to the server-side endpoint specified in the attribute (e.g.,
hx-get="/my-endpoint"). - The server-side endpoint processes the request and generates an HTML response.
- htmx receives the response and updates the DOM according to the
hx-targetandhx-swapattributes. This can involve:
— Replacing the entire element’s content.
— Inserting new content before or after the element.
— Appending content to the end of the element.
Let’s understand it in more depth with an example.
<button hx-get="/fetch-data" hx-target="#data-container">
   Fetch Data
</button>
<div id="data-container"></div>
In the above code, when the button is clicked:
- htmx sends a GET request to
/fetch-data. - The server-side endpoint fetches data and renders it as HTML.
- The response is inserted into the
#data-containerelement.
Create and delete the user
Below are the required tools/frameworks to build this basic app.
- Gin (Go framework)
- Tailwind CSS
- htmx
Basic setup
- Create main.go file at the root directory.
main.go
package main

import (
 "fmt"
 "github.com/gin-gonic/gin"
)

func main() {
 router := gin.Default()

 router.Run(":8080")
 fmt.Println("Server is running on port 8080")
}
It sets up a basic Go server, running at port 8080.
Rungo run main.goto run the application.
- Create a HTML file at the root directory, to render the user list.
users.html
<!DOCTYPE html>
<html>
   <head>
      <title>Go + htmx app </title>
      <script src="https://unpkg.com/htmx.org@2.0.0" integrity="sha384-wS5l5IKJBvK6sPTKa2WZ1js3d947pvWXbPJ1OmWfEuxLgeHcEbjUUA5i9V5ZkpCw" crossorigin="anonymous"></script>
      <script src="https://cdn.tailwindcss.com"></script>
   </head>
   <body class="text-center flex flex-col w-full gap-6 mt-10">
      <table id="user-list" class="w-1/2 mx-auto mt-4 border border-gray-300">
         <thead>
            <tr class="border border-gray-300">
               <th class="px-4 py-2">Name</th>
               <th class="px-4 py-2">Email</th>
               <th class="px-4 py-2">Actions</th>
            </tr>
         </thead>
         <tbody>
            {{ range .users }}
            <tr class="border border-gray-300">
               <td class="px-4 py-2">{{ .Name }}</td>
               <td class="px-4 py-2">{{ .Email }}</td>
               <td class="px-4 py-2">
                  <button class="bg-red-500 hover:bg-red-700 text-white font-bold py-1 px-2 rounded">Delete</button>
               </td>
            </tr>
            {{ end }}
         </tbody>
      </table>
   </body>
</html>
We have included,
- htmx using the script tag — https://unpkg.com/htmx.org@2.0.0
- Tailwind CSS with cdn link — https://cdn.tailwindcss.com
Now, we can use Tailwind CSS classes and render the templates with htmx.
As we see in users.html, we need to pass users array to the template, so that it can render the users list.
For that let’s create a hardcoded static list of users and create a route to render users.html .
Fetch users
main.go
package main

import (
 "fmt"
 "net/http"
 "text/template"

 "github.com/gin-gonic/gin"
)

func main() {
 router := gin.Default()

 router.GET("/", func(c *gin.Context) {
  users := GetUsers()

  tmpl := template.Must(template.ParseFiles("users.html"))
  err := tmpl.Execute(c.Writer, gin.H{"users": users})
    if err != nil {
       panic(err)
    }
 })

 router.Run(":8080")
 fmt.Println("Server is running on port 8080")
}

type User struct {
 Name  string
 Email string
}

func GetUsers() []User {
 return []User{
  {Name: "John Doe", Email: "johndoe@example.com"},
  {Name: "Alice Smith", Email: "alicesmith@example.com"},
 }
}
We have added a route
/to render the user list and provide a static list of users (to which we will add new users ahead).
That’s all. Restart the server and let’s visit — http://localhost:8080/ to check whether it renders the user list or not. It will render the user list as below.

Create user
- Create file user_row.html. It will be responsible for adding a new user row to the user table.
user_row.html
<tr class="border border-gray-300">
    <td class="px-4 py-2">{{ .Name }}</td>
    <td class="px-4 py-2">{{ .Email }}</td>
    <td class="px-4 py-2">
        <button class="bg-red-500 hover:bg-red-700 text-white font-bold py-1 px-2 rounded">Delete</button>
    </td>
</tr>
P.S. — You will notice that it has the same structure as the user table row in users.html . That’s because we want the same styling for the new row we are going to add.
- Modify users.html. Add the Below code above the
<table></table>tags.
<form hx-post="/users" hx-target="#user-list" hx-swap="beforeend">
   <input type="text" name="name" placeholder="Name" class="border border-gray-300 p-2 rounded">
   <input type="email" name="email" placeholder="Email" class="border border-gray-300 p-2 rounded">
   <button type="submit" class="bg-blue-500 hover:bg-blue-700 text-white font-bold py-2 px-4 rounded">Add User</button>
</form>
- hx-post=“/users” — When the form will be submitted, it will trigger post request to
/usersroute.- hx-target=“#user-list” —Specify the target where we want to add data.
- hx-swap=“beforeend” — Specify the position where want to add data. In our case we want to add new user at the end of list, so we have used
beforeendvalue.
- Let’s implement
/users(POST) route in the main.go file.
router.POST("/users", func(c *gin.Context) {
  tmpl := template.Must(template.ParseFiles("user_row.html"))

  name := c.PostForm("name")
  email := c.PostForm("email")

  user := User{Name: name, Email: email}
  err := tmpl.Execute(c.Writer, user)
  if err != nil {
   panic(err)
  }
})
It takes the name and email from the form input and executes the user_row.html.
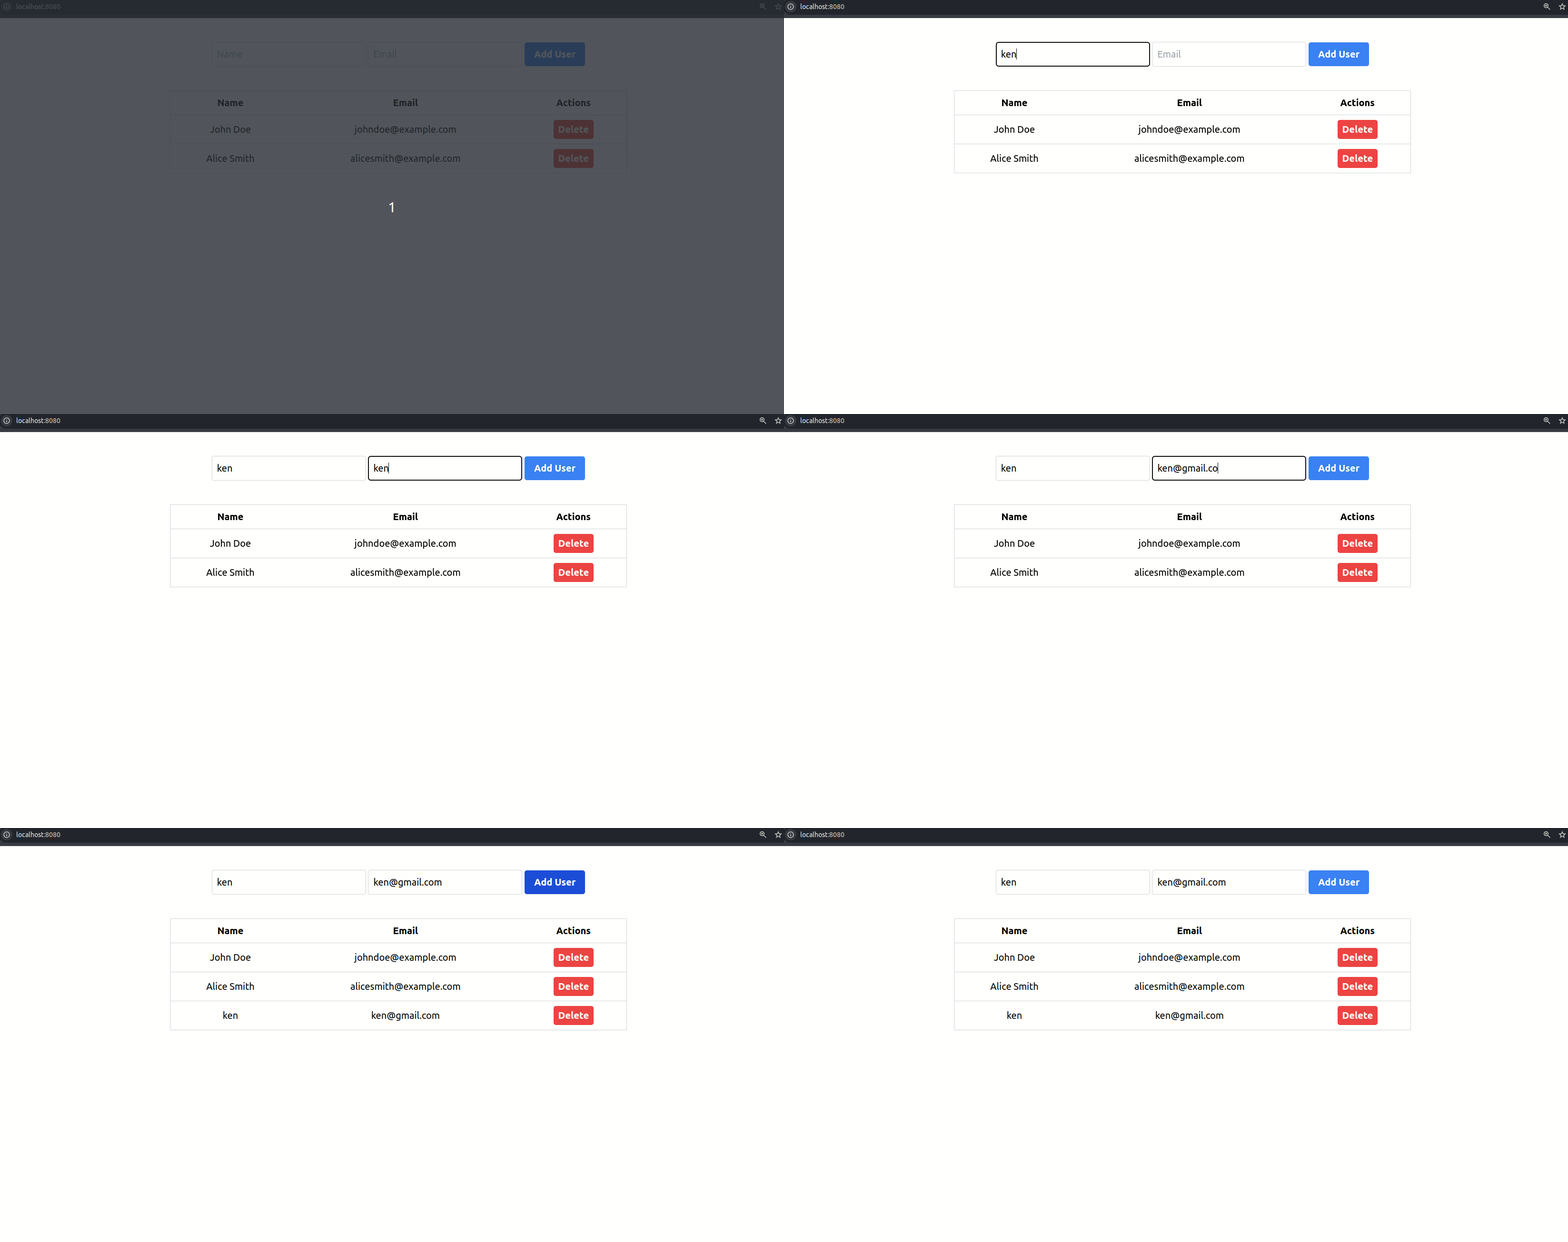
Let’s try to add a new user to the table. Visit http://localhost:8080/ and click the Add User button.

Yayy! We’ve successfully added a new user to the list 🎉.
Delete user
- Modify the Delete button HTML code as below in both files. users.html and user-row.html (because we want to delete existing users and newly added users as well).
<button hx-delete="/users/{{ .Name }}" hx-target="closest tr" hx-confirm="Are you sure you want to delete this user?" class="bg-red-500 hover:bg-red-700 text-white font-bold py-1 px-2 rounded">Delete</button>
- hx-delete=“/users/{{ .Name }}” — It triggers
DELETE /users/:namerequest. Of course, it’s not recommended way to delete something with the name, but here we have taken static users so we won’t have user_id available. That’s why we need to use name.- hx-target=“closest tr” — It detect the closest row and with given name and deletes it
- hx-confirm=“Are you sure you want to delete this user?” — It sets confirmation dialogue, used for dangerous actions.
- Add the below route to the main.go.
router.DELETE("/users/:name", func(c *gin.Context) {
  name := c.Param("name")
  fmt.Println("Delete user with name:", name)
})
Here, I have just taken a name from the route param and printed it as we’re using static values for users.
But if we use real data, we need to manage user deletion from the database within this route.
The final code should look like this.
users.html
<!DOCTYPE html>
<html>
   <head>
      <title>Go + htmx app </title>
      <script src="https://unpkg.com/htmx.org@2.0.0" integrity="sha384-wS5l5IKJBvK6sPTKa2WZ1js3d947pvWXbPJ1OmWfEuxLgeHcEbjUUA5i9V5ZkpCw" crossorigin="anonymous"></script>
      <script src="https://cdn.tailwindcss.com"></script>
   </head>
   <body class="text-center flex flex-col w-full gap-6 mt-10">
      <form hx-post="/users" hx-target="#user-list" hx-swap="beforeend">
         <input type="text" name="name" placeholder="Name" class="border border-gray-300 p-2 rounded">
         <input type="email" name="email" placeholder="Email" class="border border-gray-300 p-2 rounded">
         <button type="submit" class="bg-blue-500 hover:bg-blue-700 text-white font-bold py-2 px-4 rounded">Add User</button>
      </form>
      <table id="user-list" class="w-1/2 mx-auto mt-4 border border-gray-300">
         <thead>
            <tr class="border border-gray-300">
               <th class="px-4 py-2">Name</th>
               <th class="px-4 py-2">Email</th>
               <th class="px-4 py-2">Actions</th>
            </tr>
         </thead>
         <tbody>
            {{ range .users }}
            <tr class="border border-gray-300">
               <td class="px-4 py-2">{{ .Name }}</td>
               <td class="px-4 py-2">{{ .Email }}</td>
               <td class="px-4 py-2">
                  <button hx-delete="/users/{{ .Name }}" hx-target="closest tr" hx-confirm="Are you sure you want to delete this user?" class="bg-red-500 hover:bg-red-700 text-white font-bold py-1 px-2 rounded">Delete</button>
               </td>
            </tr>
            {{ end }}
         </tbody>
      </table>
   </body>
</html>
main.go
package main

import (
 "fmt"
 "text/template"

 "github.com/gin-gonic/gin"
)

func main() {
 router := gin.Default()

 router.GET("/", func(c *gin.Context) {
  users := GetUsers()

  tmpl := template.Must(template.ParseFiles("users.html"))
  err := tmpl.Execute(c.Writer, gin.H{"users": users})
  if err != nil {
   panic(err)
  }
 })

 router.POST("/users", func(c *gin.Context) {
  tmpl := template.Must(template.ParseFiles("user_row.html"))

  name := c.PostForm("name")
  email := c.PostForm("email")

  user := User{Name: name, Email: email}
  err := tmpl.Execute(c.Writer, user)
  if err != nil {
   panic(err)
  }
 })

 router.DELETE("/users/:name", func(c *gin.Context) {
  name := c.Param("name")
  fmt.Println("Delete user with name:", name)
 })

 router.Run(":8080")
 fmt.Println("Server is running on port 8080")
}

type User struct {
 Name  string
 Email string
}

func GetUsers() []User {
 return []User{
  {Name: "John Doe", Email: "johndoe@example.com"},
  {Name: "Alice Smith", Email: "alicesmith@example.com"},
 }
}
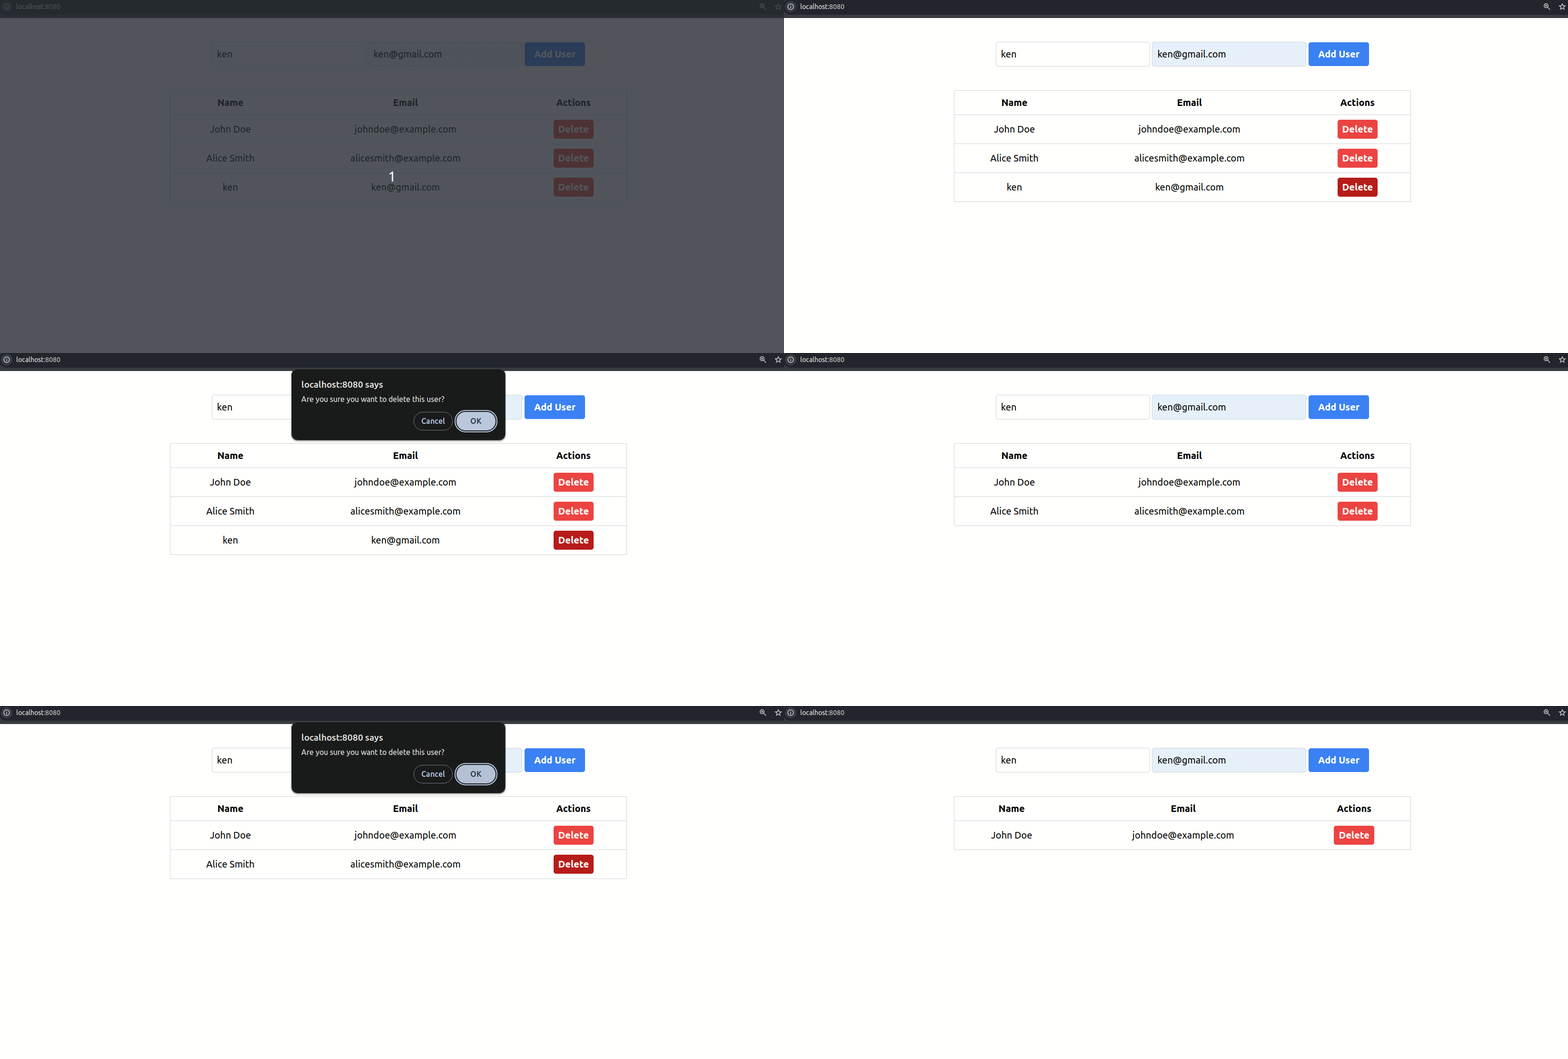
Let’s see how it works.

Congratulations🎉!! We have learned how to use htmx in Golang!
Shorthand tips to get more out of htmx
While htmx is a powerful tool, it can sometimes feel a bit magical, especially for beginners. Here are some tips to make your htmx experiences more intuitive and efficient:
1. Clear and Concise Attribute Naming:
- hx-get: Fetches content from a URL.
- hx-post: Sends a POST request to a URL.
- hx-target: Specifies the DOM element where the response will be inserted.
- hx-swap: Determines how the response content will be swapped into the target element.
- hx-trigger: Defines events that trigger the request (e.g., click, hover, input).
2. Leverage htmx’s Built-in Features:
- hx-ext: Extend htmx’s functionality with custom behaviors.
- hx-params: Pass parameters to the server-side endpoint.
- hx-confirm: Add confirmation dialogs before actions.
- hx-indicator: Show loading indicators while requests are in progress.
3. Write Clear and Concise Server-Side Code:
- Minimal HTML: Return only the necessary HTML content.
- Efficient Data Transfer: Optimize data transfer to minimize payload size.
- Error Handling: Implement robust error handling to provide informative feedback to the user.
However, these are only a few of the abilities, there are many more as we dig deep.
Key benefits of htmx
- Reduced Page Loads: Only the necessary parts of the page are updated. That reduces the initial loading time of a page and performance is improved.
- Enhanced User Experience: Faster and more responsive applications.
- Simplified Development: Less complex JavaScript and frontend frameworks.
- Server-Side Rendering: Leverage server-side rendering for SEO and initial page load performance.
TL;DR
- htmx is a powerful HTML tool that leverages the ability to perform server actions and client updates without using Javascript.
- By seamlessly integrating server-side rendering and partial page updates, htmx significantly enhances user experience and performance.
- htmx can be used with any platform like Go,Node.js, PHP, etc.

