Automate Flutter iOS App Deployment with GitHub Actions and Codemagic CLI
Background
In this tutorial, we’ll set up an automated deployment process for a Flutter iOS application using GitHub Actions. You’ll learn how to create a workflow that runs Codemagic CLI tools to build your app and upload it to TestFlight.
By the end, you’ll have an efficient app distribution pipeline that saves time and effort, allowing you to focus more on development and less on manual deployments.
Why Codemagic?
Codemagic CLI tools are a free, open-source set of command-line utilities that power Codemagic’s CI/CD service.
When I first tried setting up auto-deployment for my iOS app, I faced several frustrating and hard-to-resolve pipeline failures. That’s when I discovered Codemagic CLI — it required no configuration and simplified the entire build automation process.
Since then, I’ve been happily using it! 😅
Sponsored
We are what we repeatedly do. Excellence, then, is not an act, but a habit. Try out Justly and start building your habits today!
Prerequisites
Before you begin, ensure you have the following:
- An App Store account enrolled in the Apple Developer Program.
- A Flutter application ready for deployment.
- A GitHub repository is set up for your project.
For this tutorial, I’ll be using the Flutter counter app as an example.
Let’s get started! 👇
To make it easier, I have divided the article into 3 separate sections.
- Basic Workflow Setup
- Setting things up in App Store Connect
- Add Jobs For Distribution
Now, let’s walk through each of these steps together!
Ready? Let’s go! 🚀
Basic Workflow Setup
In this section, we’ll add a basic GitHub workflow setup.
Step 1: Creating a Workflow File
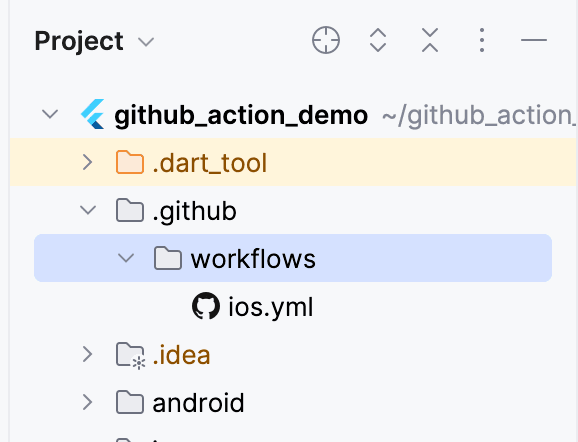
- Navigate to your project’s root directory.
- If you don’t already have one, create a new directory named
.github/workflows. - Inside this directory, create a new YAML file (e.g.,
ios.yml).
Step 2: Set up workflow trigger
In the newly created YAML file, start by defining the workflow trigger
name: Push iOS build on TestFlight

on:
  push:
    branches:
- mainname: This is the name of the workflow. It will be displayed under the Actions tab in your GitHub repository.
on: This defines the event that triggers the workflow. In this case, the workflow will be triggered automatically whenever code is pushed to the main branch (e.g. when a sub-branch is merged into main).
- There are other events you can use as triggers depending on your workflow needs, such as pull requests, tags, or schedule-based triggers.
Step 3: Set up the jobs
jobs:
  ios_deployment:
    runs-on:  macos-latest
A workflow is made up of one or more jobs.
Each job runs in a specific environment, specified by the runs-on attribute. In this case, we're using a macOS environment (macos-13), which is essential for building iOS apps.
Step 4: Add the jobs
steps:
   - name: Checkout Repo
uses: actions/checkout@v4Checkout: This action checks out your repository into the $GITHUB_WORKSPACE, allowing your workflow to access the code and resources in your repository.
   - name: Set up Flutter SDK
     uses: flutter-actions/setup-flutter@v3
     with:
        channel: stable
        version: 3.24.0
Set up Flutter SDK: This step configures the Flutter environment in GitHub Actions. Make sure the specified version is compatible with the version in your pubspec.yaml file.
By default, this action will use the latest version, but you can specify a different version as needed.
- name: Install dependencies & Lint check
  run: |
    flutter clean
    flutter pub get
    flutter analyze --fatal-infos
Install dependencies and lint check: In this step, we run flutter pub get to install all necessary dependencies for the project.
We also perform a lint check using dart analyze --fatal-infos. This lint check is optional; you can skip it if you prefer not to perform static analysis on your code.
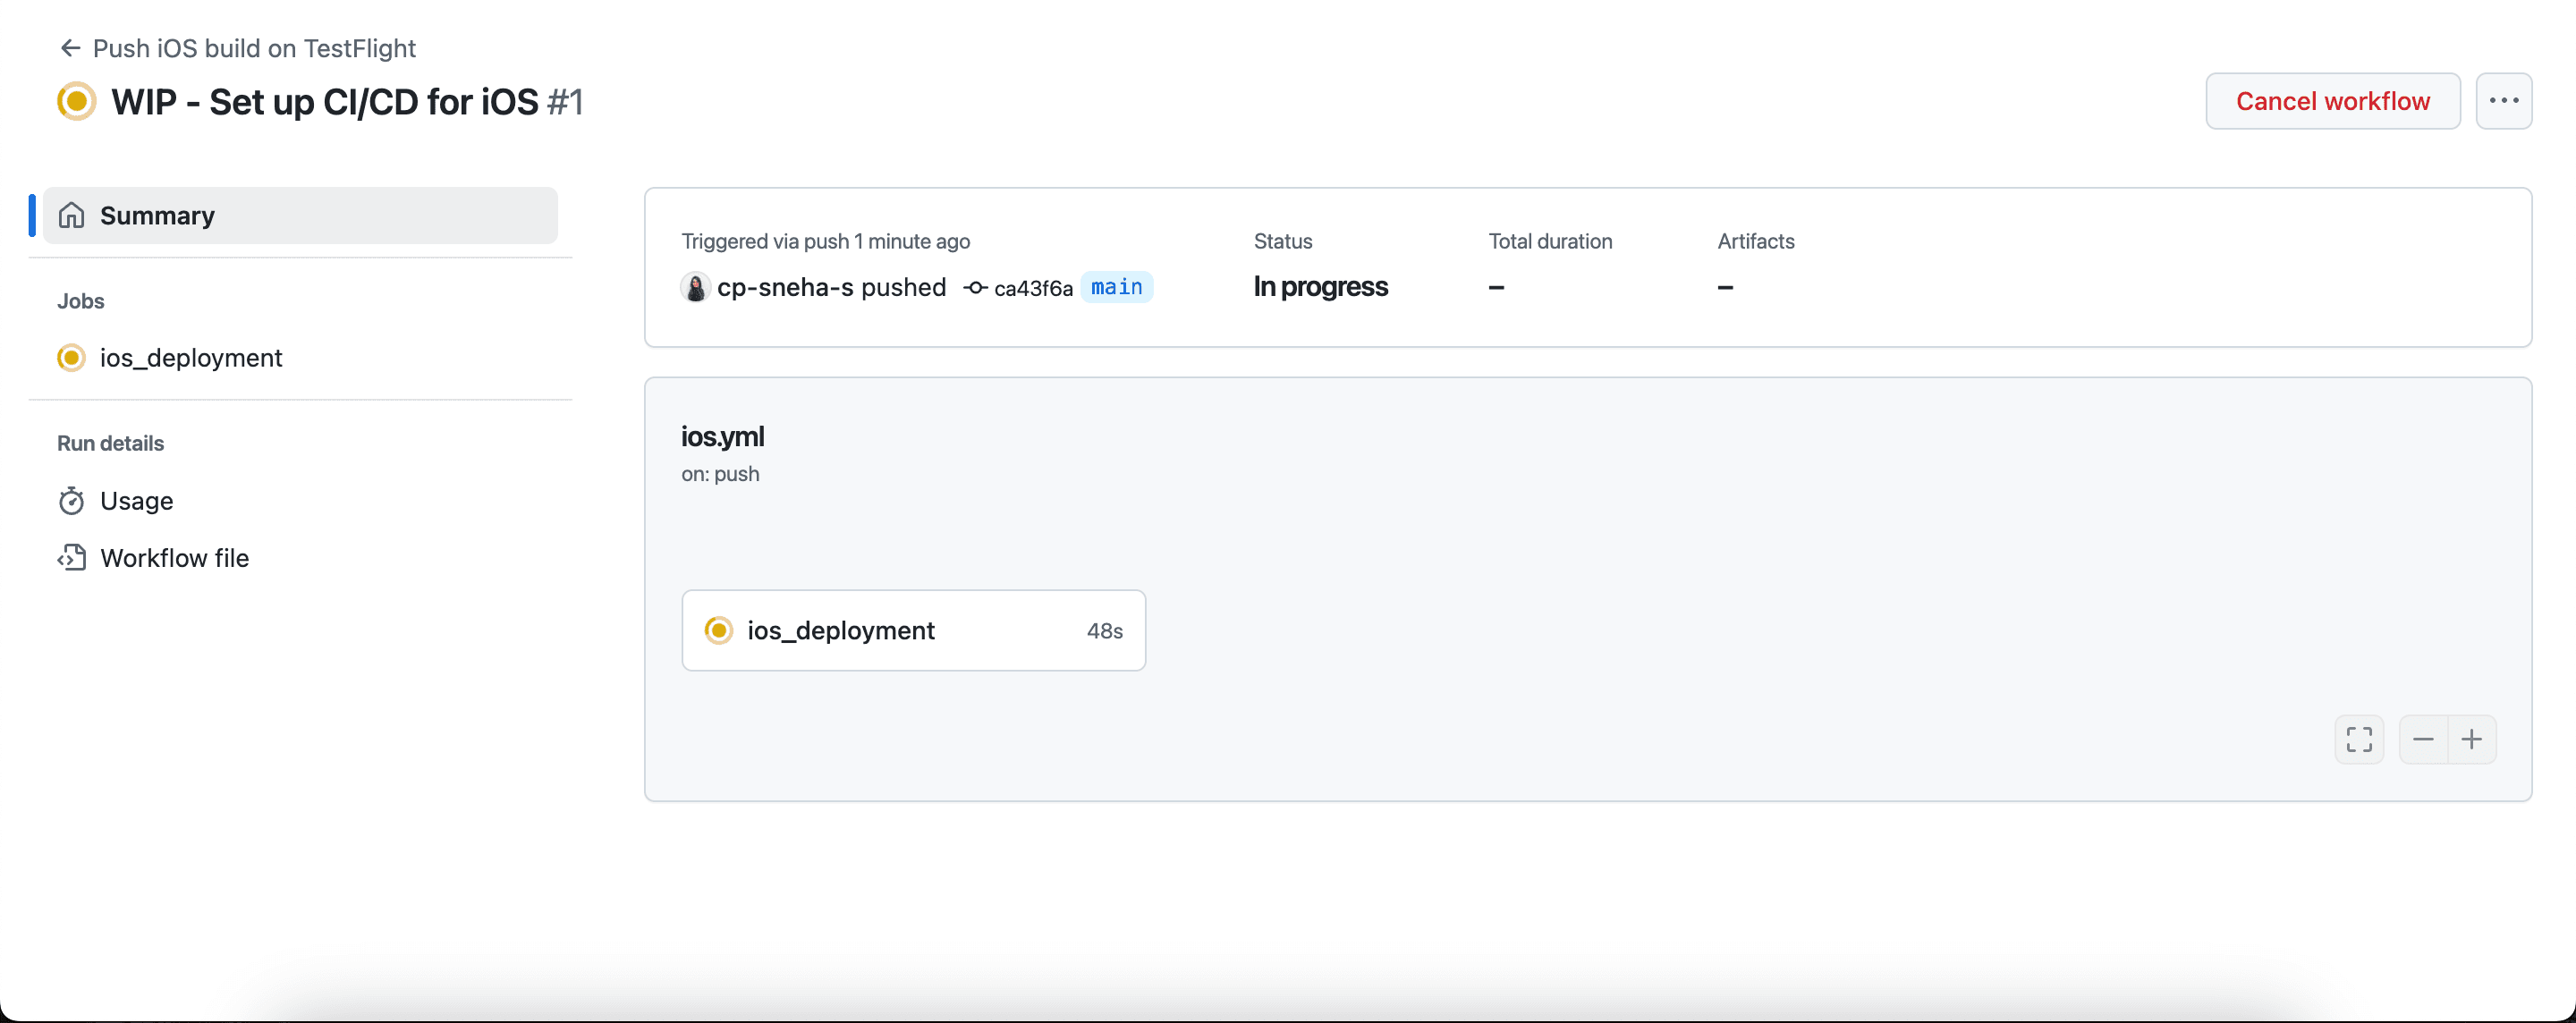
Once you push this workflow file to the main branch, you will see a build queued in the Actions tab of the GitHub repository.
Setting things up in App Store Connect
Before we proceed, we need to set up your app in App Store Connect. Skip this step if you’ve already done it.
Let’s walk through them. 👇
1. Create a Distribution certificate
You can follow this guide if you don’t have it.
Skip this if you’ve a Distribution certificate already.
2. Create an App Bundle identifier
- Go to Identifiers and create a new ID. This bundle ID is required to create an app in the App Store.

- Select App IDs and continue.
- Select App to Register.
- Provide a Description, Bundle ID, and check capabilities you need in the app.
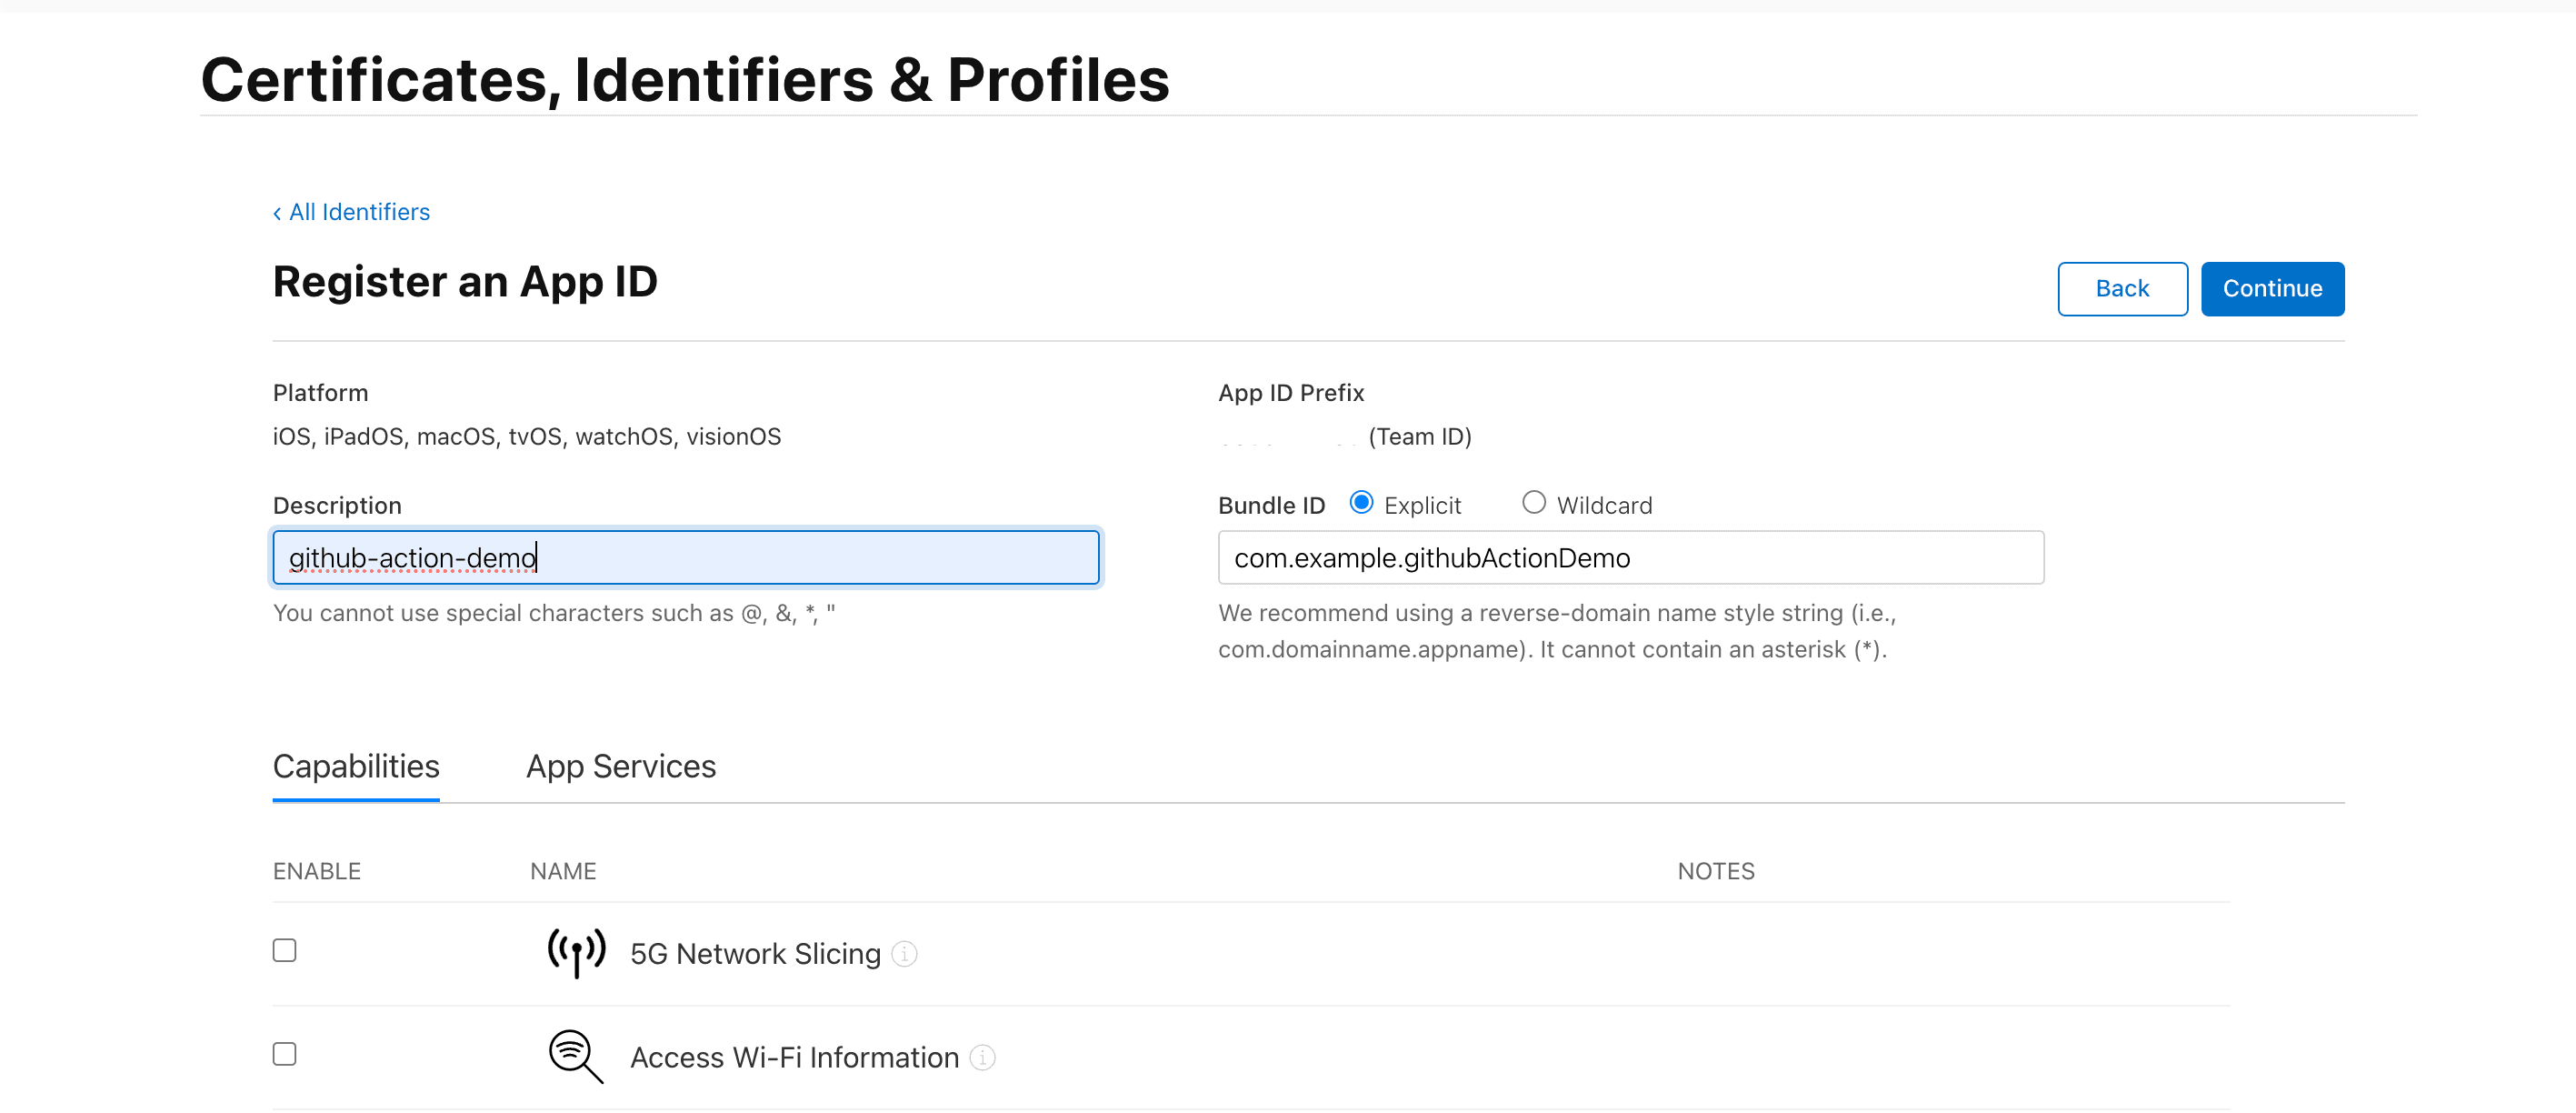
- Click continue and now you have a new identifier for the app.
3. Create a Provisioning Profile
A Provisioning Profile is linked to a Distribution Certificate and identifies a team or organization. This profile authorizes your app to run on devices without needing Xcode.
- Go to the Profiles section and click on the + sign to create a new Provisioning Profile.
- Select App Store Connect under Distibution and click Continue.
- Choose the App ID you created earlier and click Continue.
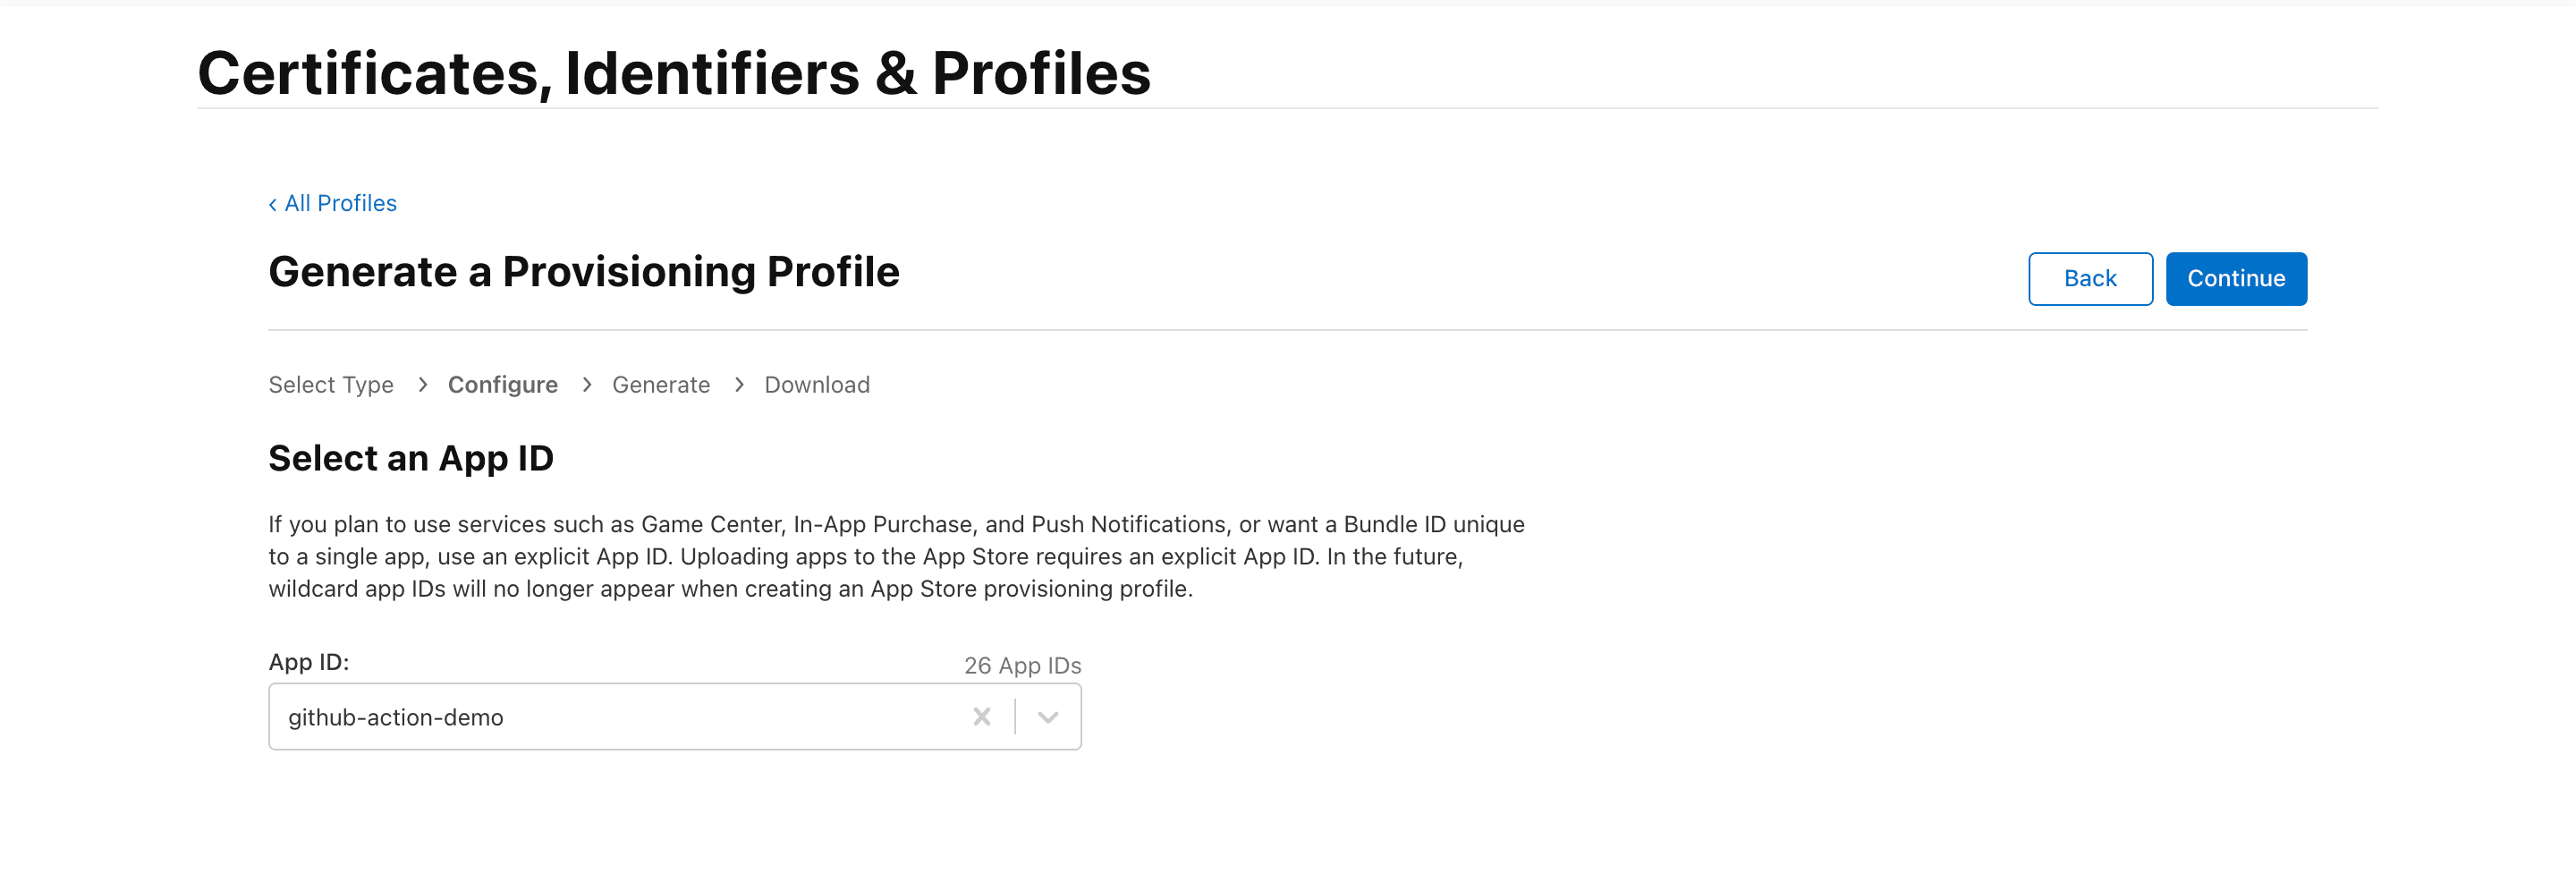
- Select the Distribution Certificate for the Provisioning Profile and click Continue.
- Add the Provisioning Profile name and click Continue.
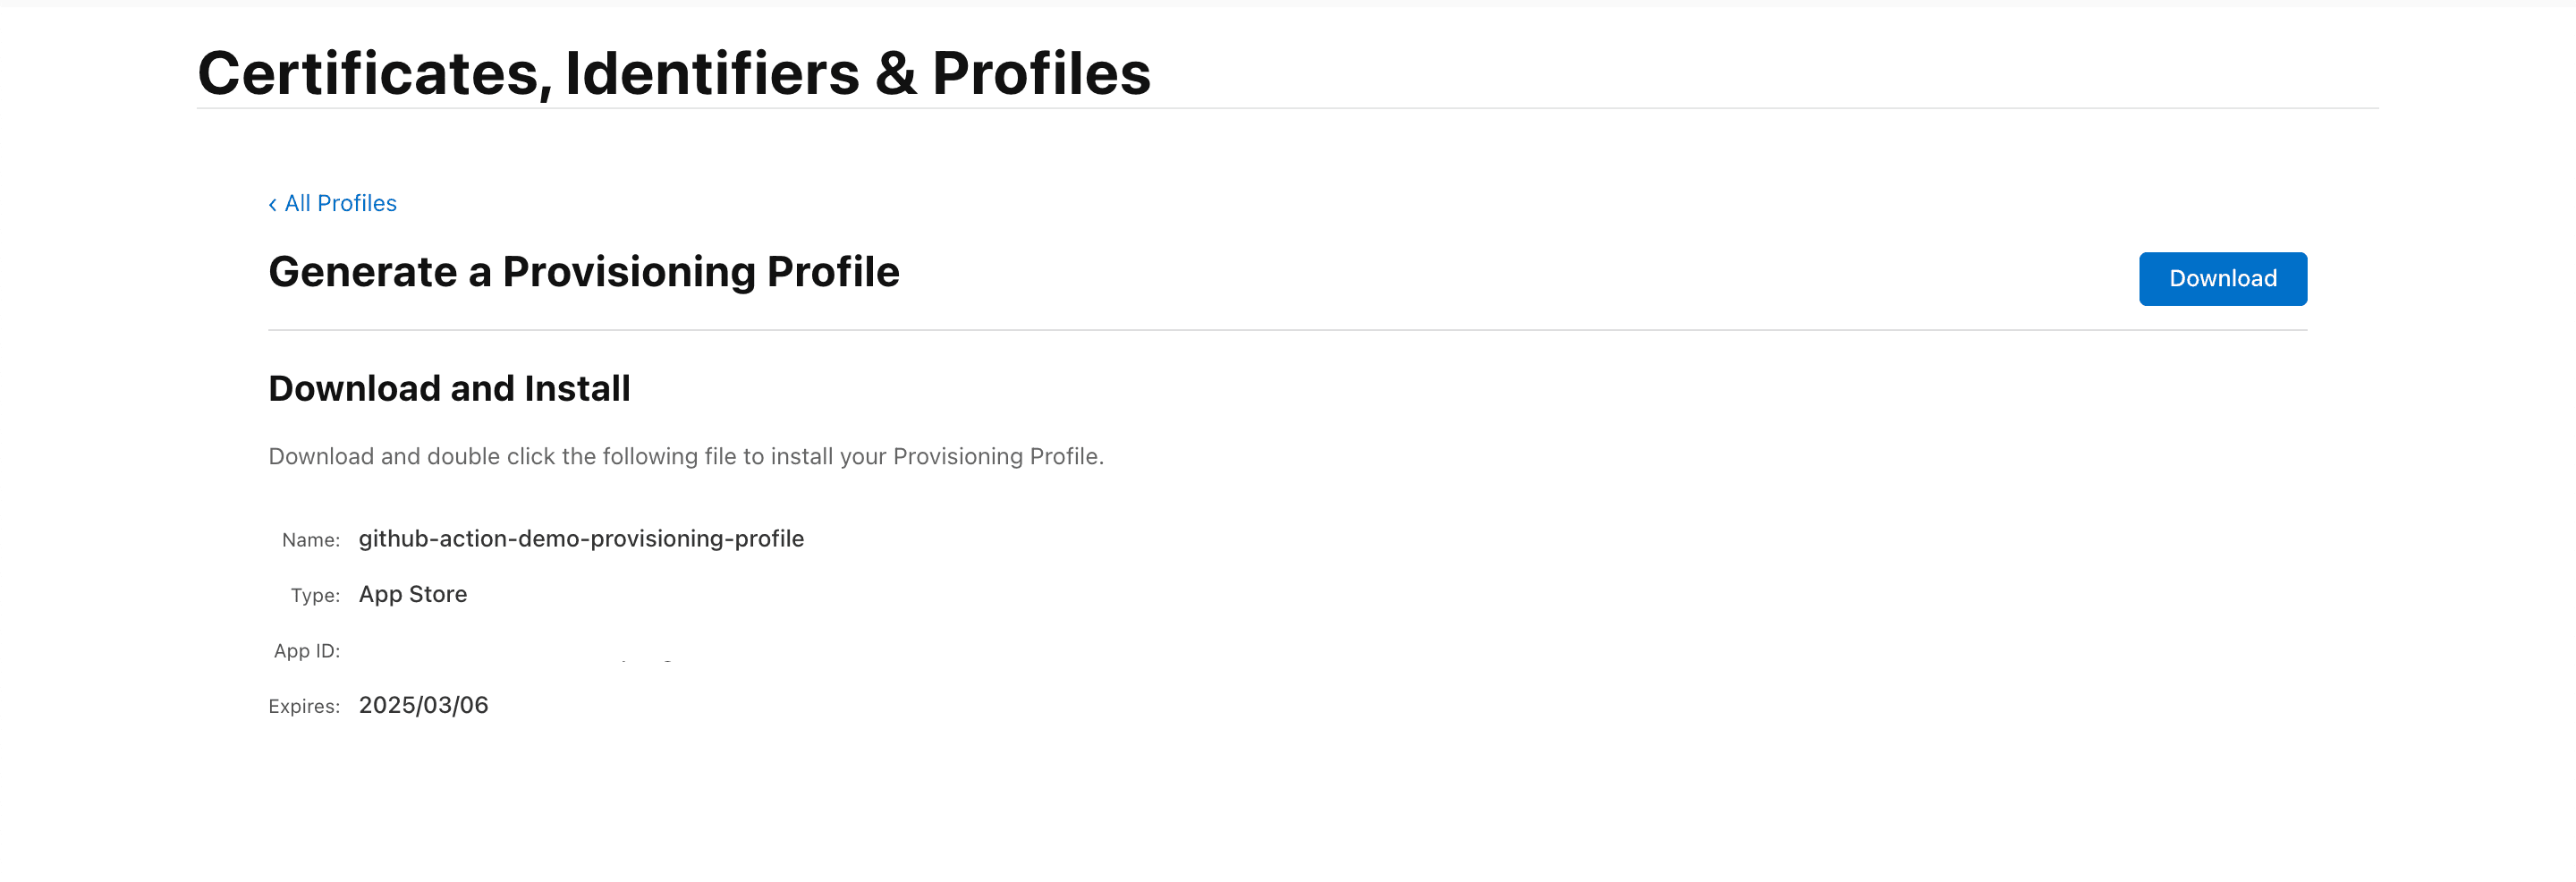
- Download the Provisioning Profile.
4. Create a New App
- Go to Apps and create a New App
- Fill in the required details in the form and click on Create.
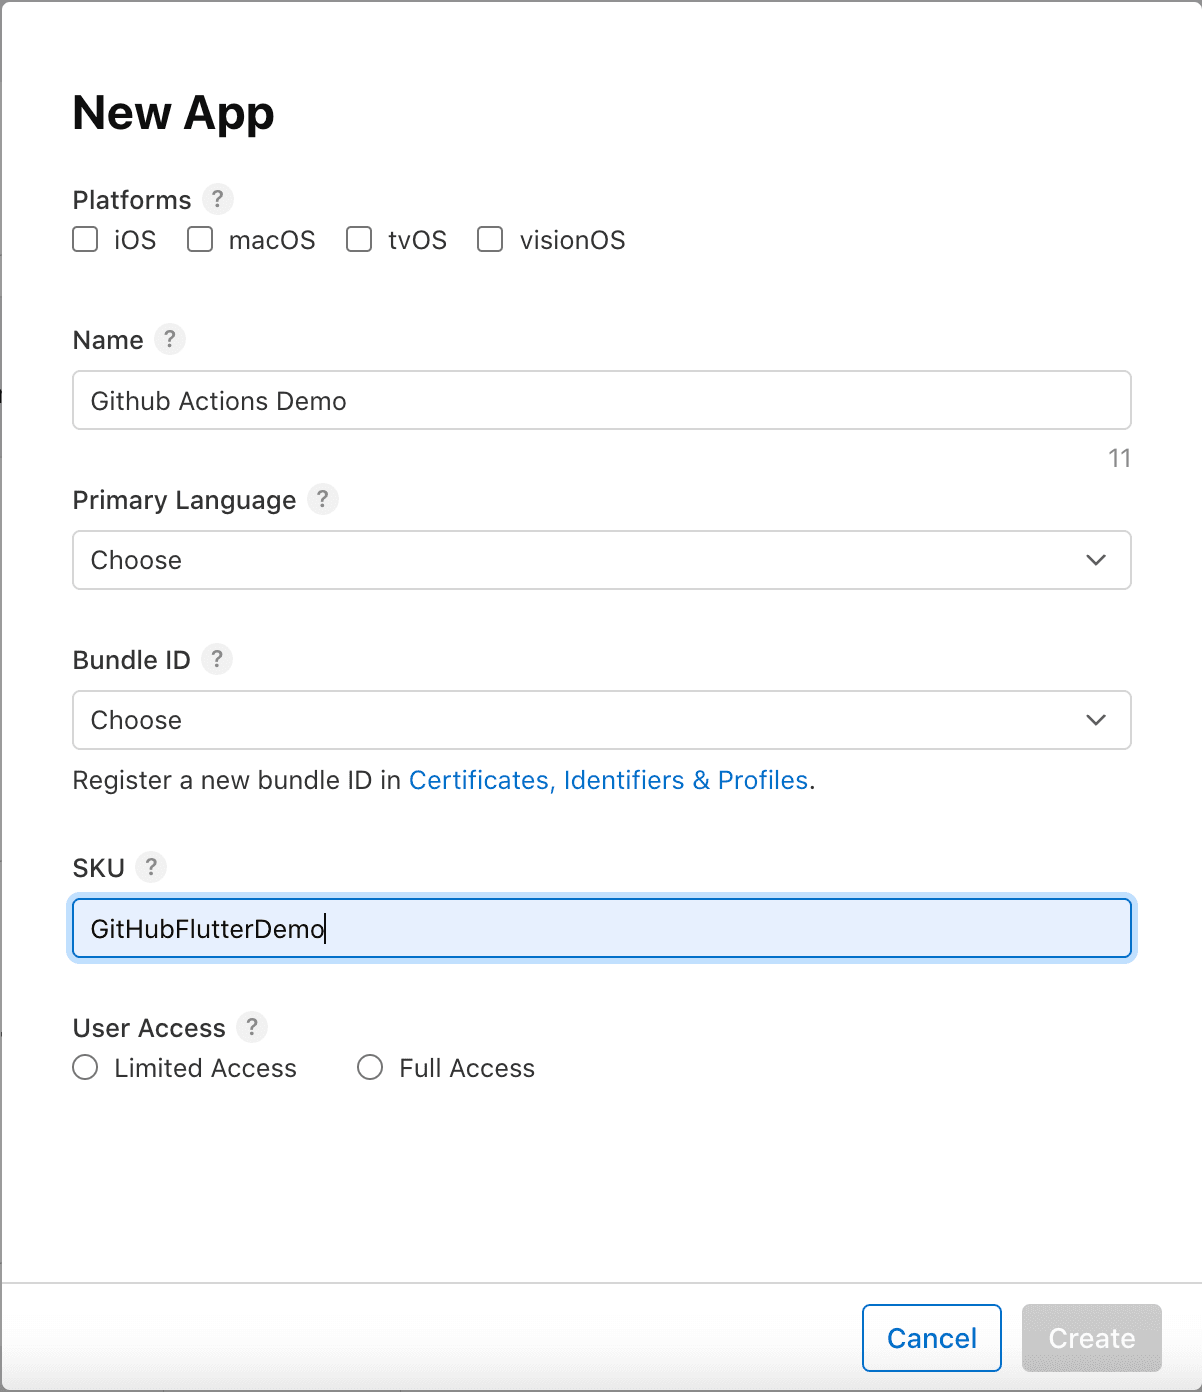
- Congratulations! You have successfully created a new app.
5. Generate an API key
As per the Codemagic guide, to enable Codemagic CLI tools to upload and fetch data from App Store Connect, you’ll need to generate an App Store Connect API key with App Manager access.
- Log in to App Store Connect and navigate to Users and Access > Integrations.
- Click on the + sign to generate a new API key.
- Provide a name for the key and choose an App Manager access level.
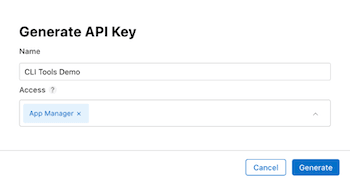
- After generating the key, it will be listed among the active keys. Click Download API Key to save the private key for later use.
Note: The key can only be downloaded once, so be sure to keep it at a secure location.

- Save this Issuer ID, KEY ID, and the API Key, as we’ll need it later.
6. Download the Certificate
- Download the distribution certificate you created in Step 5.

- Locate the downloaded certificate and open it using Keychain Access. Next, Export the certificate to create a file with a
.p12extension. You can save this file in your Downloads folder or any directory you prefer.

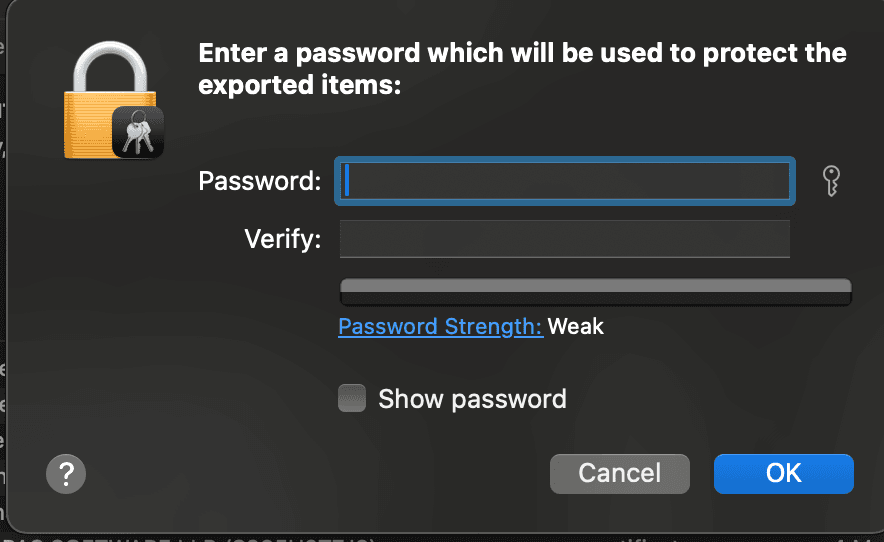
- When you click to download, you’ll be prompted to set a password for the certificate. This password will be required to access the certificate, so make sure to remember it. You will need to add it as a variable in your workflow.
Now we’ve completed all the basic setups for App Store Connect, it’s time to configure the environment variables for GitHub Actions.
Add Jobs For Distribution
Step 1: Add Secrets to the Repository
In this step, we’ll add all the necessary environment variables and secrets that will be needed later to set up our pipeline.
To add new secrets and variables to your repository, go to Settings > Secrets and Variables.
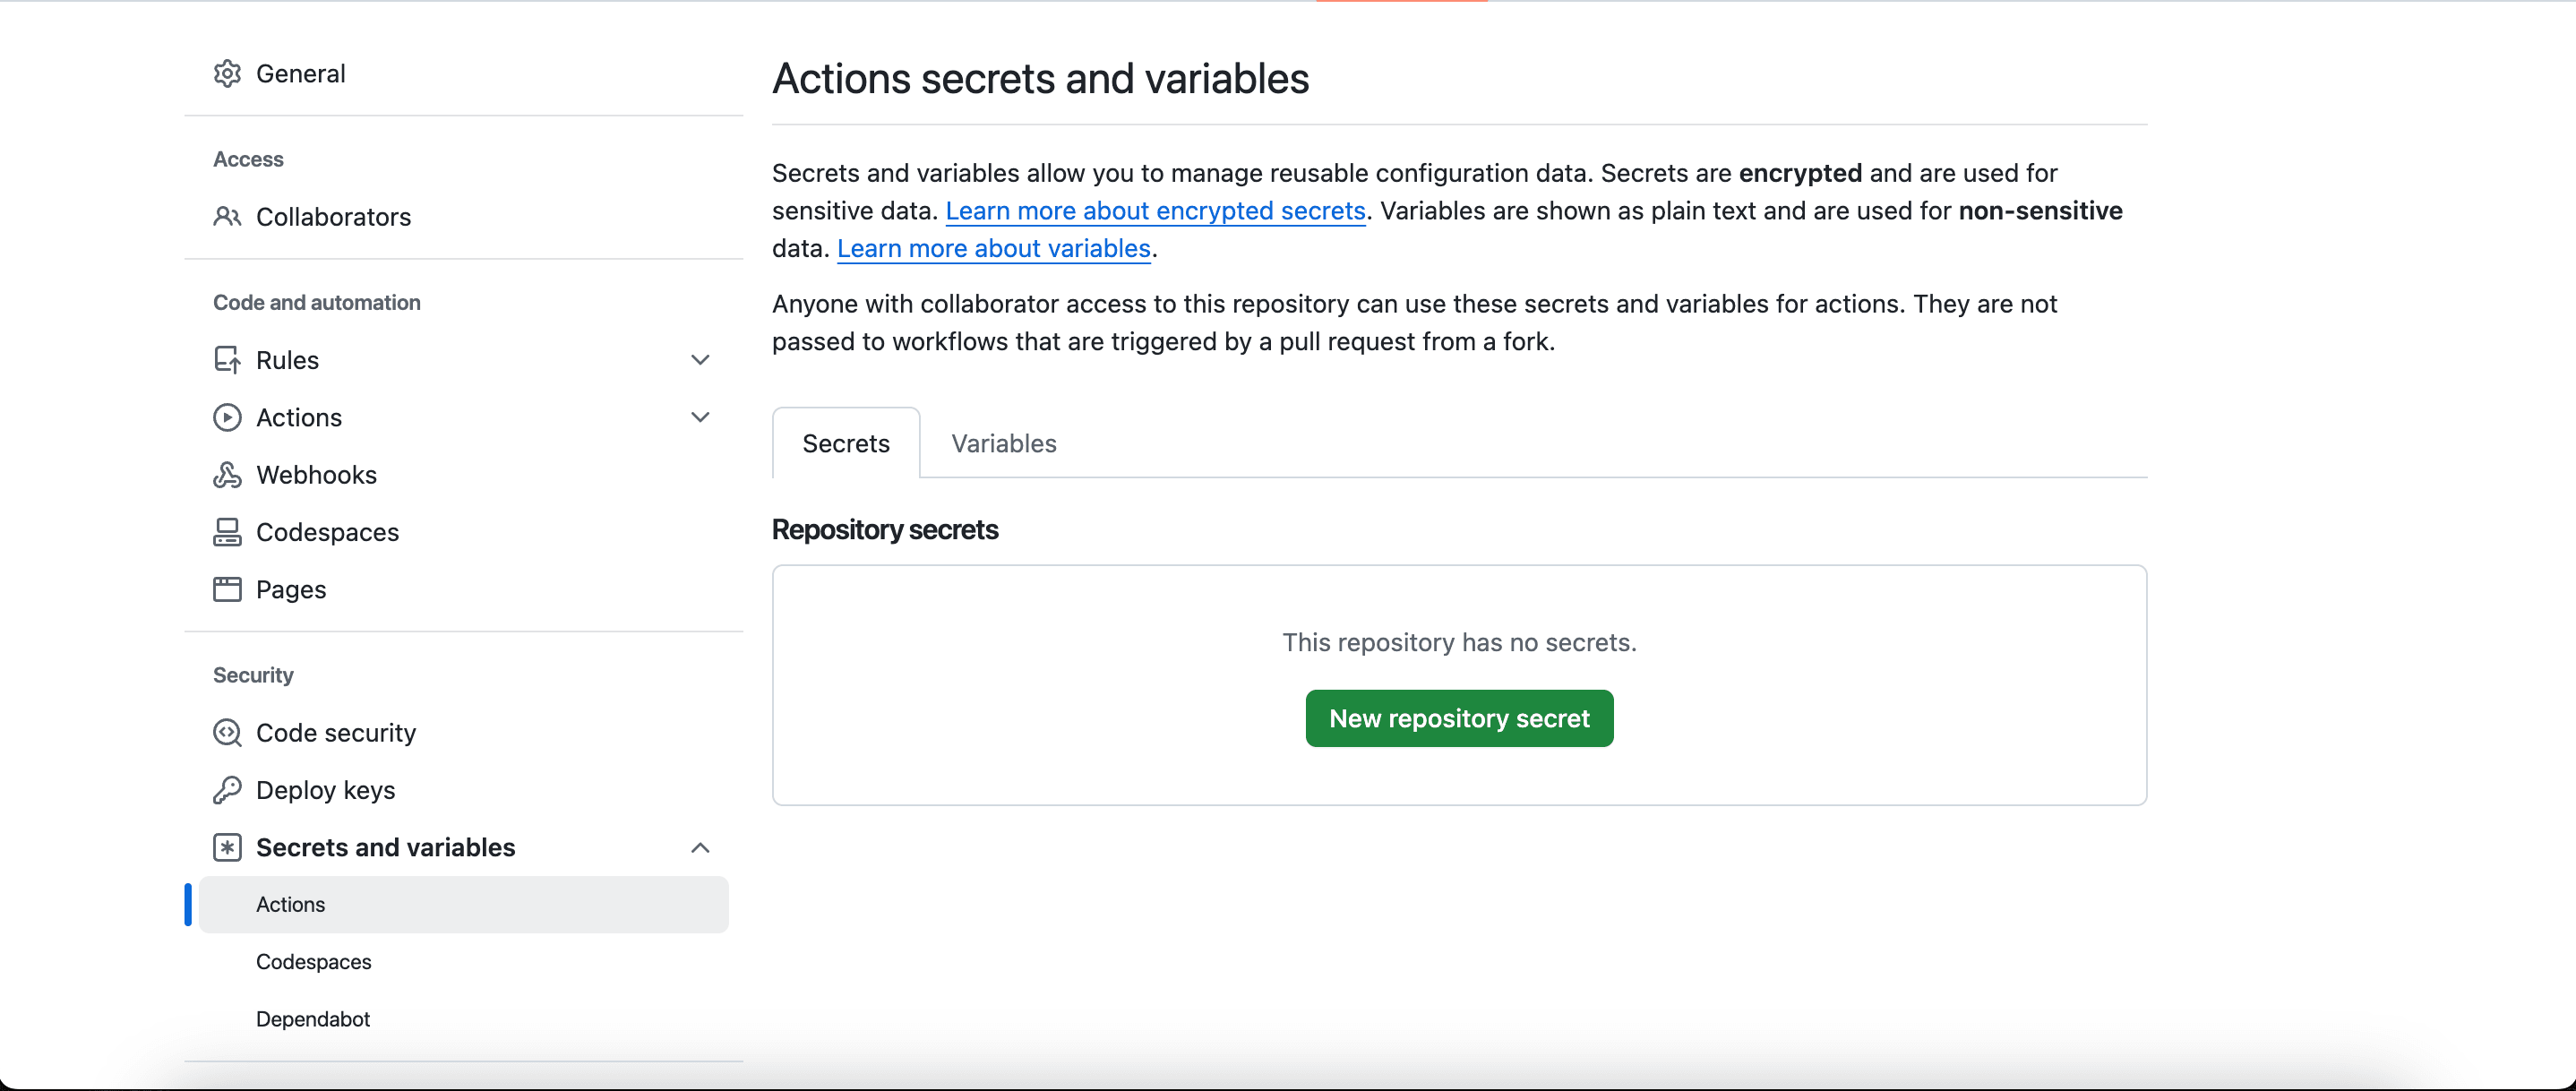
What is the difference between the two?
- Secrets are encrypted values that are only visible to you and the workflow steps that need access to them. They are designed to store sensitive information, such as passwords, API keys, or certificates, ensuring that this data remains secure.
- Environment Variables, in contrast, are plain text values that can be accessed by any workflow step. They are typically used for configuration options that do not require the same level of protection as secrets.
Now it’s time to add the required secrets.
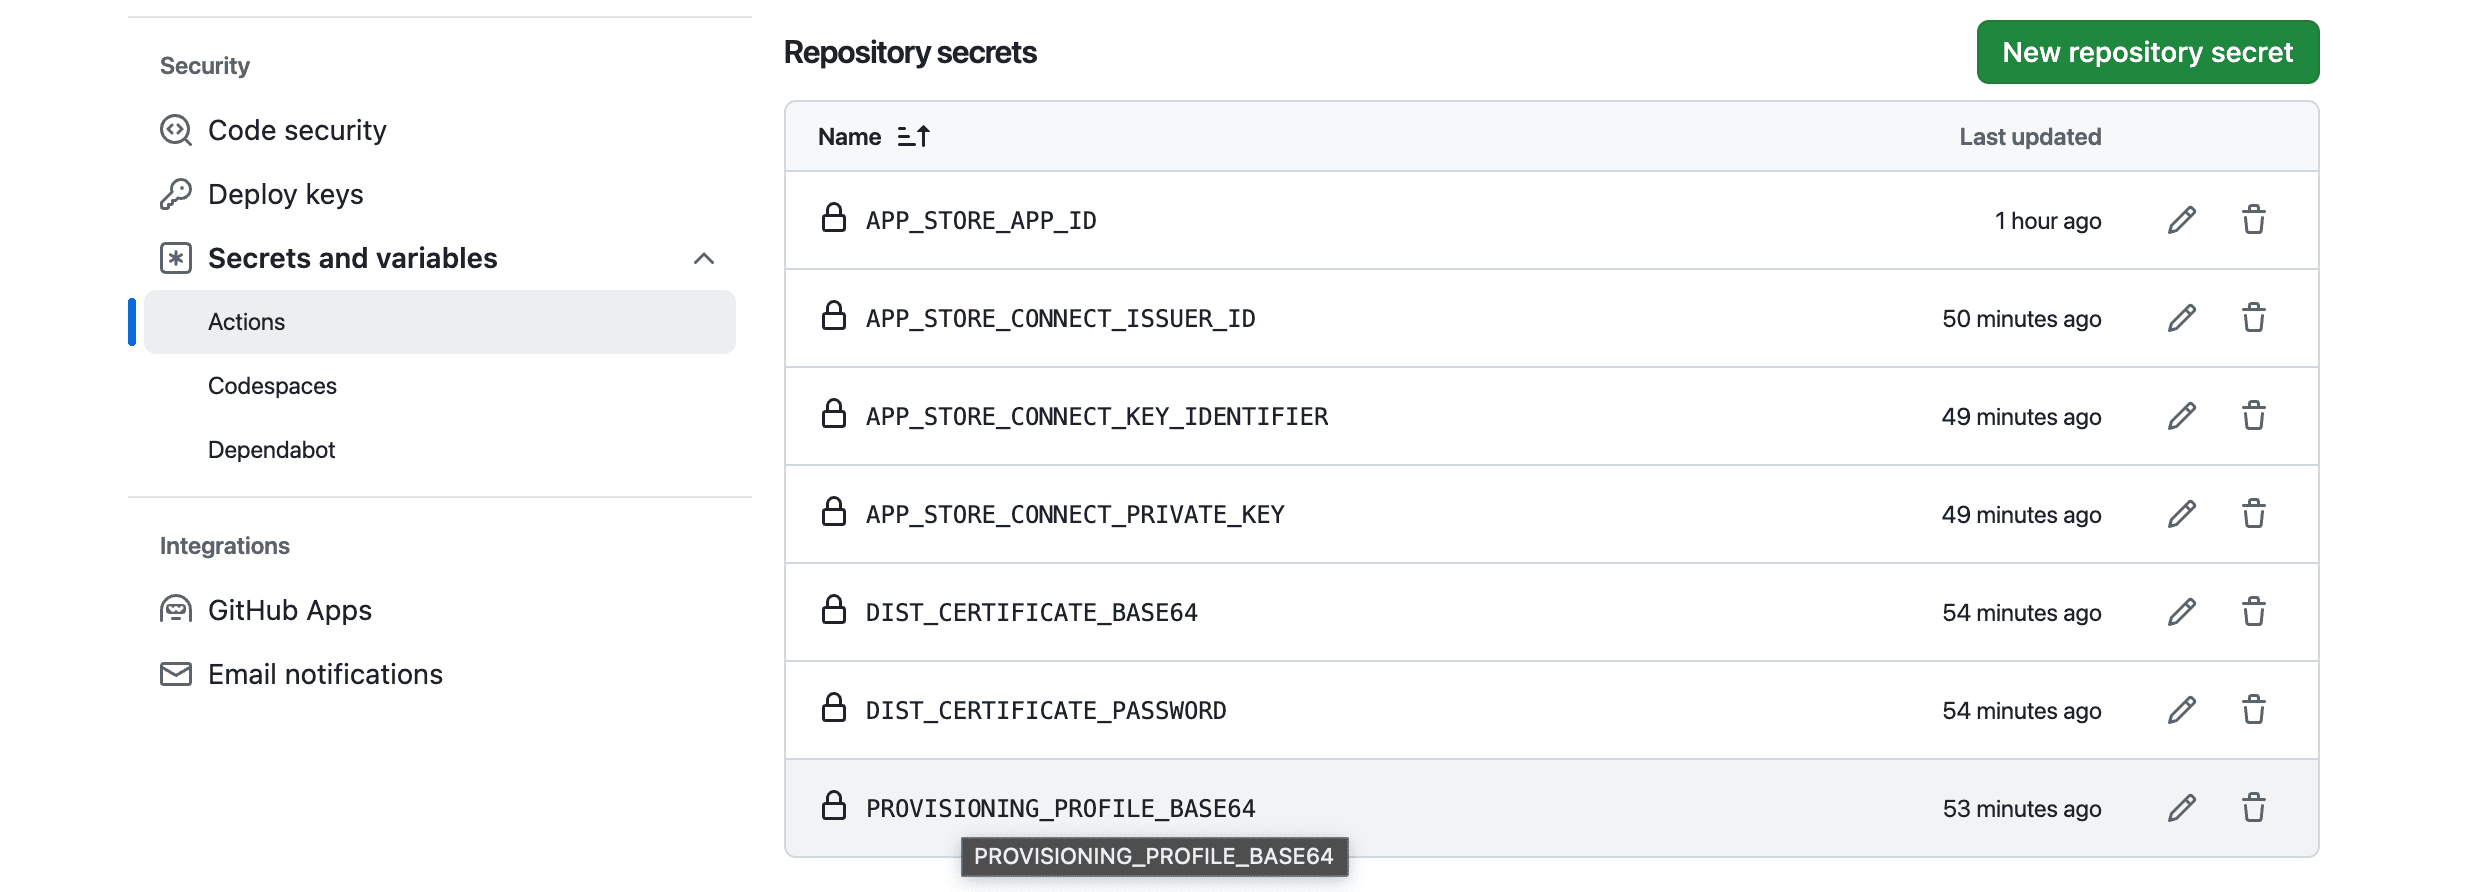
APP_STORE_APP_ID: The ID of the app on the App Store. It’s a 10-digit number You can find it by App Store Connect > App > General > General Information > Apple ID.APP_STORE_CONNCET_ISSUER_ID: The Issuer ID, generated in Step 3.APP_STORE_CONNECT_KEY_IDENTIFIER: This is the Key ID of the App Store Connect API key created in Step 3.APP_STORE_CONNECT_PRIVATE_KEY: The Key which is downloaded in step 3. It is a text file with a.p8extension. Copy and paste the content directly into the secret value field.DIS_CERTIFICATE_BASE64: We have downloaded a distribution certificate, but it needs to be encoded in Base64 format. To do this, navigate to the directory where the certificate is stored and run thebase64 -i <certificate_name>.mobileprovision | pbcopycommand in your terminal. Thepbcopycommand copies the content to your clipboard. Add this encoded string as a variable.DIST_CERTIFICATE_PASSWORD: This is the password for the distribution certificate file. Copy and paste the password directly into the secret value field.PROVISIONING_PROFILE_BASE64: Similar to the certificate, you’ll need to Base64 encode the content of the provisioning profile file and copy it to the secret value field. Use this command:base64 -i <profile_name>.mobileprovision | pbcopy
Step 2: Set up environment variables
In this step, we will define the environment variables needed for your workflow.
jobs:
  ios_deployment:
    runs-on: macos-latest
    env:
      APP_STORE_CONNECT_PRIVATE_KEY: ${{ secrets.APP_STORE_CONNECT_PRIVATE_KEY }}
      APP_STORE_CONNECT_ISSUER_ID: ${{ secrets.APP_STORE_CONNECT_ISSUER_ID }}
      APP_STORE_CONNECT_KEY_IDENTIFIER: ${{ secrets.APP_STORE_CONNECT_KEY_IDENTIFIER }}
      APP_STORE_APP_ID: ${{ secrets.APP_STORE_APP_ID }}
      DISTRIBUTION_CERTIFICATE: ${{ secrets.DIST_CERTIFICATE_BASE64 }}
      DISTRIBUTION_CERTIFICATE_PASSWORD: ${{ secrets.DIST_CERTIFICATE_PASSWORD }}
      PROVISIONING_PROFILE: ${{ secrets.PROVISIONING_PROFILE_BASE64 }}
Make sure to replace the variable names with the ones you created in your repository secrets.
Step 3: Add Jobs for Distribution
- name: Install Codemagic CLI tools
run: pip install codemagic-cli-tools- This job installs the Codemagic CLI tools on the runner for building and deploying our app.
 - name: Initialize keychain
run: keychain initialize- This job will initialize the macOS keychain.
- name: Set up Provisioning Profiles
  run: |
      PROFILES_HOME="$HOME/Library/MobileDevice/Provisioning Profiles"
      mkdir -p "$PROFILES_HOME"
      PROFILE_PATH="$(mktemp "$PROFILES_HOME"/$(uuidgen).mobileprovision)"
      echo ${PROVISIONING_PROFIL} | base64 --decode > $PROFILE_PATH
This job sets up the provisioning profiles required for your app. It does the following:
PROFILES_HOMEis the directory where provisioning profiles are stored.mkdir -p— Creates the directory if it doesn’t already exist.PROFILE_PATHline generates a temporary file path for the provisioning profile.echo $PROVISIONING_PROFILE | base64 — decode > $PROFILE_PATH—Decodes the Base64 encoded provisioning profile and saves it to the specified path.
- name: Set up signing certificate
  run: |
    echo $DISTRIBUTION_CERTIFICATE | base64 --decode > /tmp/certificate.p12
    keychain add-certificates --certificate /tmp/certificate.p12 --certificate-password $DISTRIBUTION_CERTIFICATE_PASSWORD
This job sets up the signing certificate required for your app. It performs the following actions:
- The first command decodes the certificate and saves it as a
.p12file in the temporary directory (/tmp). - The
keychain add-certificatescommand adds the.p12certificate to the macOS keychain using the provided password.
- name: Setup Code signing settings on Xcode project
  run: xcode-project use-profiles
This job sets up the Xcode project to use the retrieved or decoded signing profiles, making sure your app is correctly configured for distribution.
- name: Build ipa for Distribution
  run: |
    file='VERSION'
    fileData=`cat $file`
    IFS='.'
    read -a versionValue <<< "$fileData"
    buildNumber=$(( ${versionValue[0]} * 1000000 + ${versionValue[1]} * 10000 + ${{ github.run_number }} ))
    IFS=''
    buildName="${versionValue[0]}.${versionValue[1]}.${{ github.run_number }}"
    echo "Uploading build $buildName"
    flutter build ipa --release --build-number=$buildNumber --build-name=$buildName --export-options-plist=$HOME/export_options.plist
- Create Version Number: Auto-deployment requires an auto-incrementing version number, as the App Store requires a unique version code and version name for each build. While you could add a job to fetch the latest version from the App Store, I prefer a simpler method for automatic versioning.
- Add a VERSION File: Create a file named
VERSIONin the root directory of your project. This file will be easy to access for further use. Start by adding the initial build name, such as1.0.0. - The version name is constructed from a combination of major, minor, and patch numbers. In this setup, we will use
github.run_numberas our patch number, which increments with each run.
- Build IPA for Distribution: This step generates the .ipa file for distribution using the flutter build ipa command with the --release flag to build the app in release mode. Additionally, include the --export-options-plist flag to properly configure the archiving settings.
- name: Upload to App Store Connect
  run: |
    APP_FILE=$(find $(pwd) -name "*.ipa")
    app-store-connect publish \
    --path "$APP_FILE"
In this step, we use the app-store-connect publish command to upload the built app archive to App Store Connect. Simply pass the file path of the .ipa file using the --path flag.
Now it’s time to push your code! Go ahead and push your changes to the main branch.
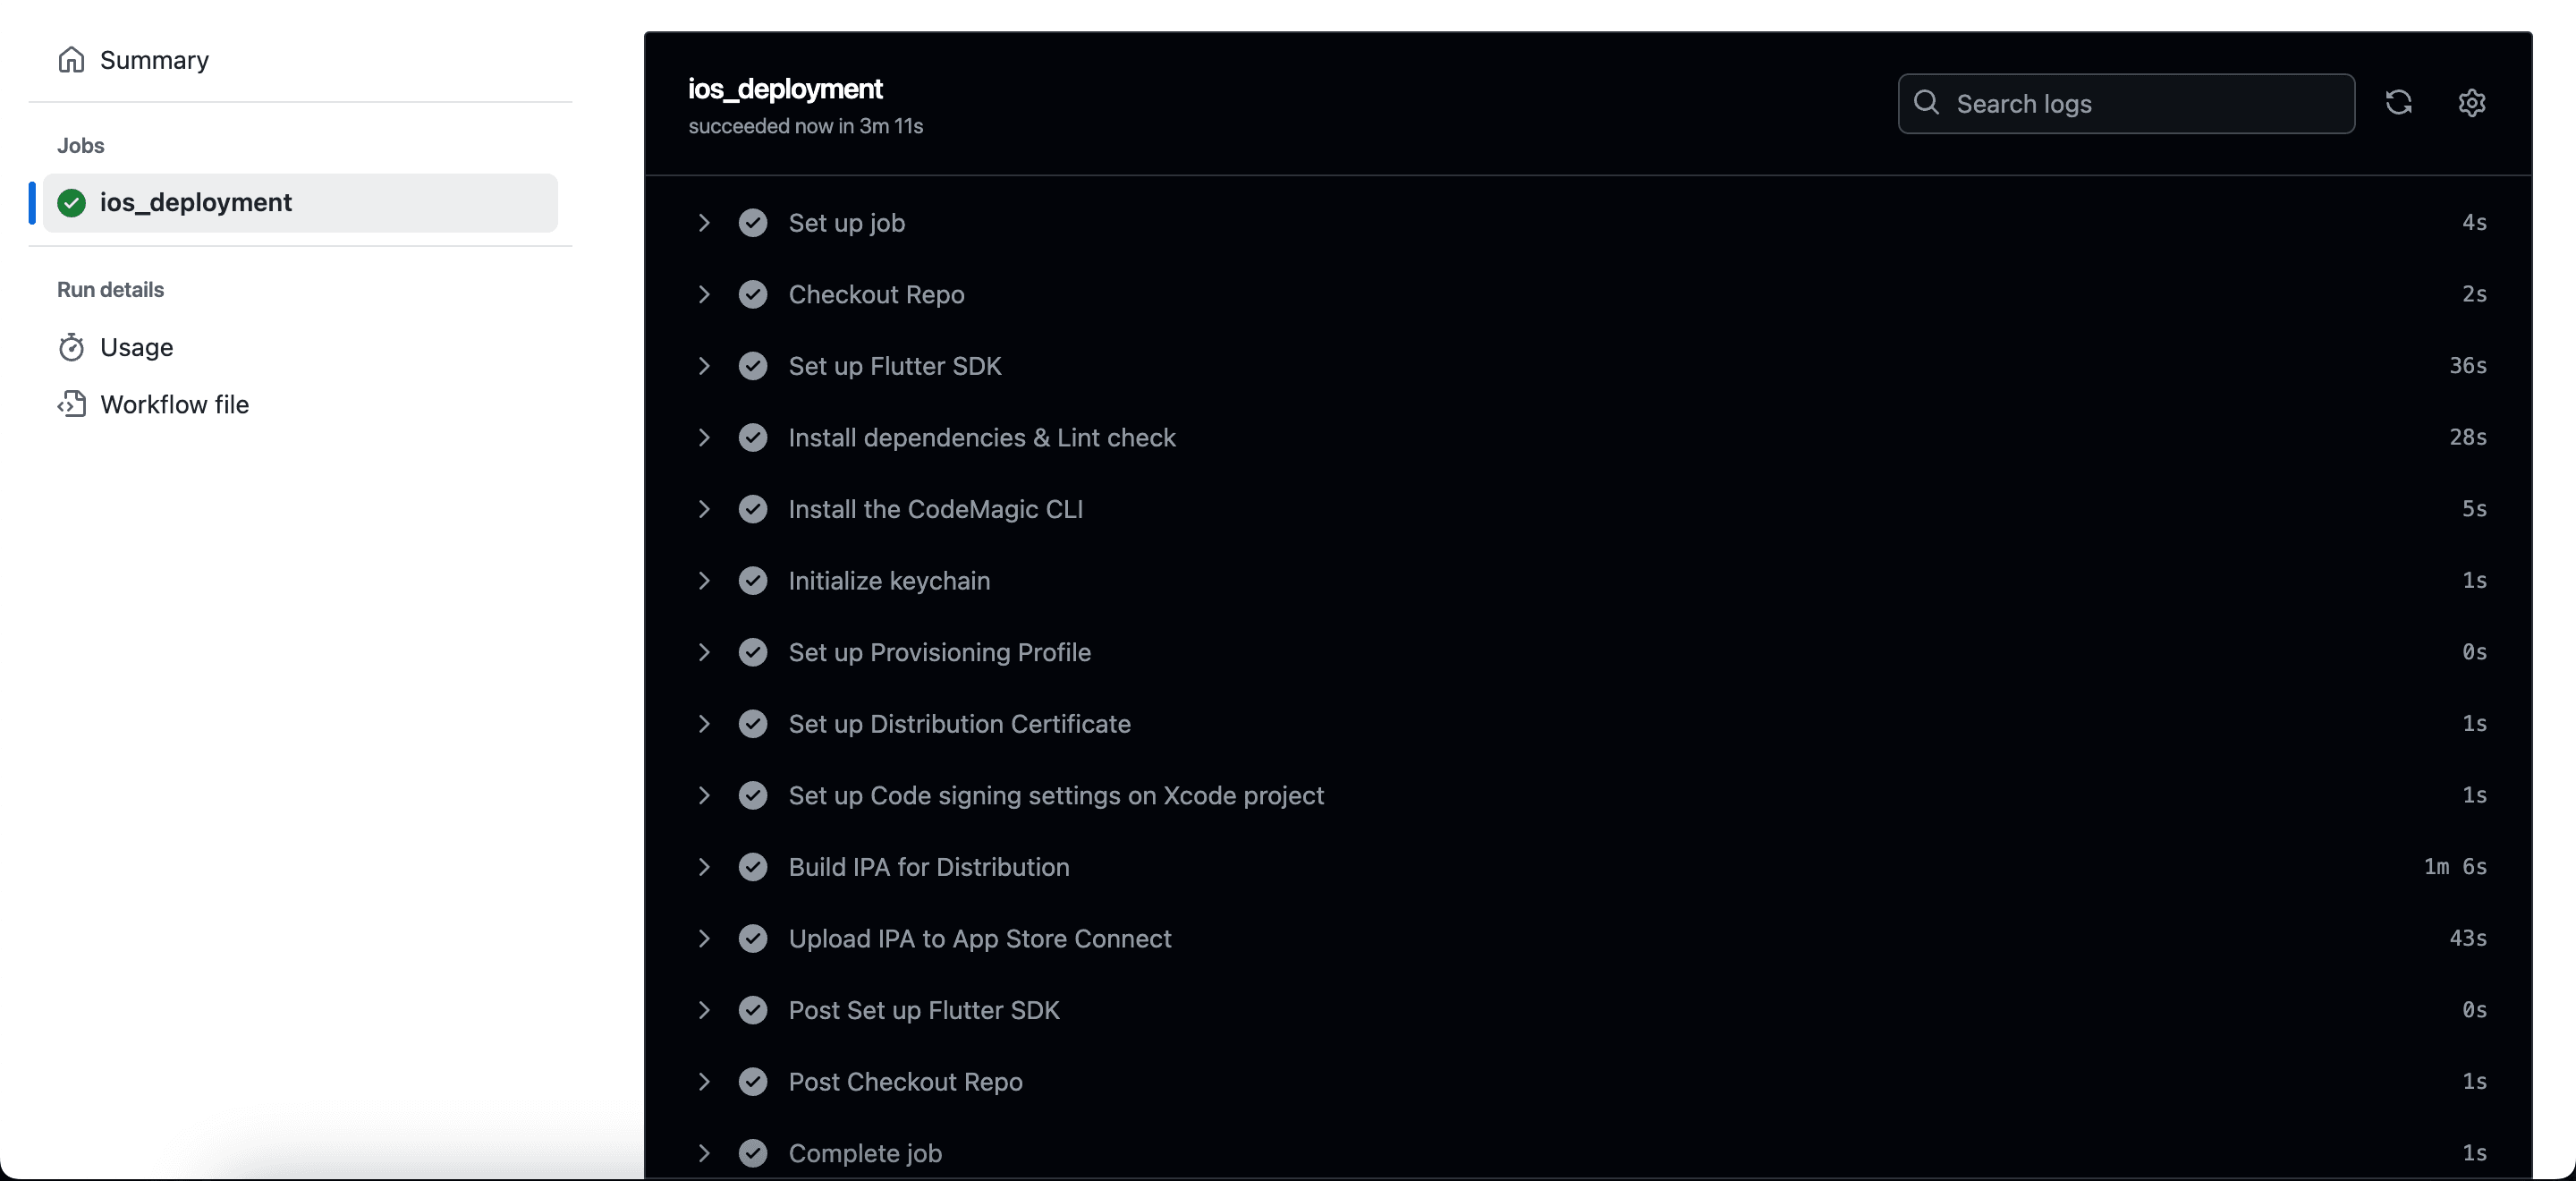
Everything is set up, and your automated deployment process is now in action. You will get your latest app update on Testflight after successfully completing the deployment job. ✅
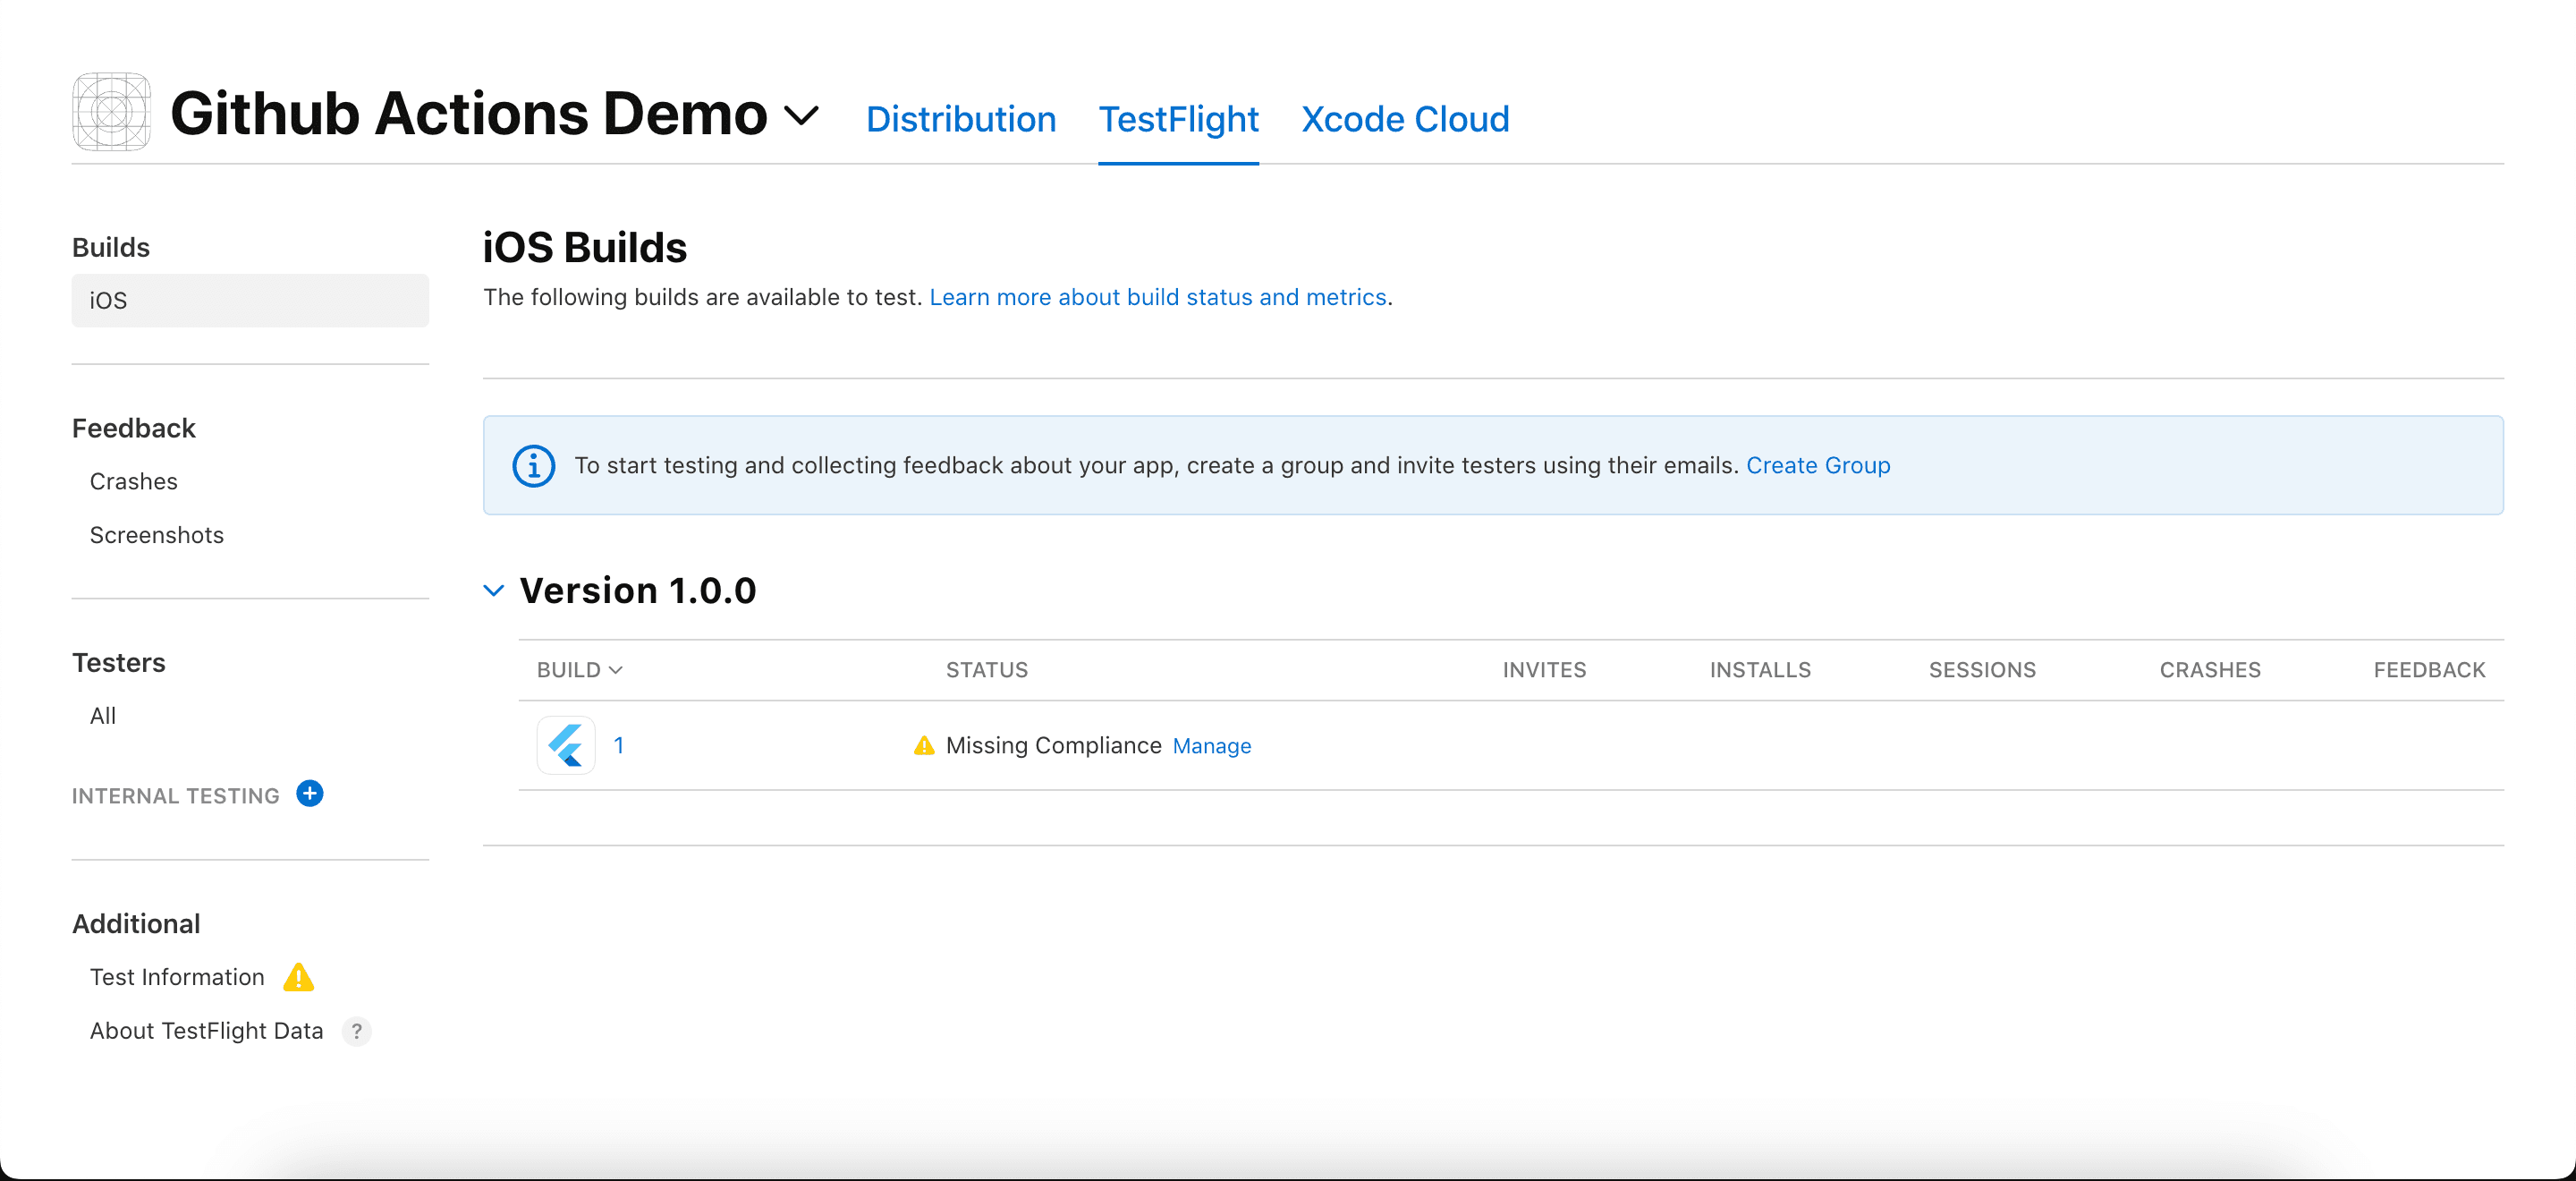
Congratulations!! 👍
Once you’re ready and satisfied with the app’s performance, you can proceed to submit it for review on the App Store.
🚀 Coming up next, we’ll deploy the Flutter Android application just like we did for iOS.
Here is the full code:
name: Push iOS build on TestFlight

on:
  push:
    branches:
      - main

jobs:
  ios_deployment:
    runs-on: macos-latest
    env:
      APP_STORE_CONNECT_PRIVATE_KEY: ${{ secrets.APP_STORE_CONNECT_PRIVATE_KEY }}
      APP_STORE_CONNECT_ISSUER_ID: ${{ secrets.APP_STORE_CONNECT_ISSUER_ID }}
      APP_STORE_CONNECT_KEY_IDENTIFIER: ${{ secrets.APP_STORE_CONNECT_KEY_IDENTIFIER }}
      APP_STORE_APP_ID: ${{ secrets.APP_STORE_APP_ID }}
      DISTRIBUTION_CERTIFICATE: ${{ secrets.DIST_CERTIFICATE_BASE64 }}
      DISTRIBUTION_CERTIFICATE_PASSWORD: ${{ secrets.DIST_CERTIFICATE_PASSWORD }}
      PROVISIONING_PROFILE: ${{ secrets.PROVISIONING_PROFILE_BASE64 }}

    steps:
      - name: Checkout Repo
        uses: actions/checkout@v4

      - name: Set up Flutter SDK
        uses: flutter-actions/setup-flutter@v3
        with:
          channel: stable
          version: 3.24.0

      - name: Install dependencies & Lint check
        run: |
          flutter clean
          flutter pub get
          flutter analyze --fatal-infos

      - name: Install the CodeMagic CLI
        run:  pip install codemagic-cli-tools

      - name: Initialize keychain
        run: keychain initialize

      - name: Set up Provisioning Profile
        run: |
          PROFILES_HOME="$HOME/Library/MobileDevice/Provisioning Profiles"
          mkdir -p "$PROFILES_HOME"
          PROFILE_PATH="$(mktemp "$PROFILES_HOME"/$(uuidgen).mobileprovision)"
          echo ${PROVISIONING_PROFILE} | base64 --decode > "$PROFILE_PATH"
          echo "Saved provisioning profile $PROFILE_PATH"

      - name: Set up Distribution Certificate
        run: |
          echo $DISTRIBUTION_CERTIFICATE | base64 --decode > /tmp/certificate.p12
          keychain add-certificates --certificate /tmp/certificate.p12 --certificate-password $DISTRIBUTION_CERTIFICATE_PASSWORD

      - name: Set up Code signing settings on Xcode project
        run: xcode-project use-profiles

      - name: Build IPA for Distribution
        run: |
          file='VERSION'
          fileData=`cat $file`
          IFS='.'
          read -a versionValue <<< "$fileData"
          buildNumber=$(( ${versionValue[0]} * 1000000 + ${versionValue[1]} * 10000 + ${{ github.run_number }} ))
          IFS=''
          buildName="${versionValue[0]}.${versionValue[1]}.${{ github.run_number }}"
          echo "Uploading build $buildName"
          flutter build ipa --release --build-number=$buildNumber --build-name=$buildName --export-options-plist=$HOME/export_options.plist

      - name: Upload IPA to App Store Connect
        run: |
          APP_FILE=$(find $(pwd) -name "*.ipa")
          app-store-connect publish \
          --path "$APP_FILE"
Source code
Here is the demo Repository.
Conclusion
In this tutorial, we walked through the steps to set up an automated deployment process for your Flutter iOS application using GitHub Actions and Codemagic CLI tools.
By following the guide, you’ve learned how to create a workflow that builds your app and effortlessly pushes it to TestFlight, making your release process much smoother.
Without a doubt, Setting up an automated release process will help you focus on adding features to code instead of worrying about manual deployments. I hope you found this guide helpful and that it makes your auto-deployment journey easier!
Happy coding!!
Useful Articles
Whether you need...
- *High-performing mobile apps
- *Bulletproof cloud solutions
- *Custom solutions for your business.

